Archivo del Autor: Alvaro Ortiz

Presentación de la Sony FS7 II (PXW-FS7M2)

Como buenos amantes de este mundillo del vídeo, imagino que hoy habréis visto que se ha anunciado una nueva versión de la PXW-FS7, la FS7 II (oficialmente, la referencia es PXW-FS7M2). De hecho, tengo un par de vídeos (los típicos aburridetes que subo yo, en castellano y en inglés, en mi canal de YouTube: https://www.youtube.com/channel/UCMUk_ztypSGRWw23mawsi0g/videos ).


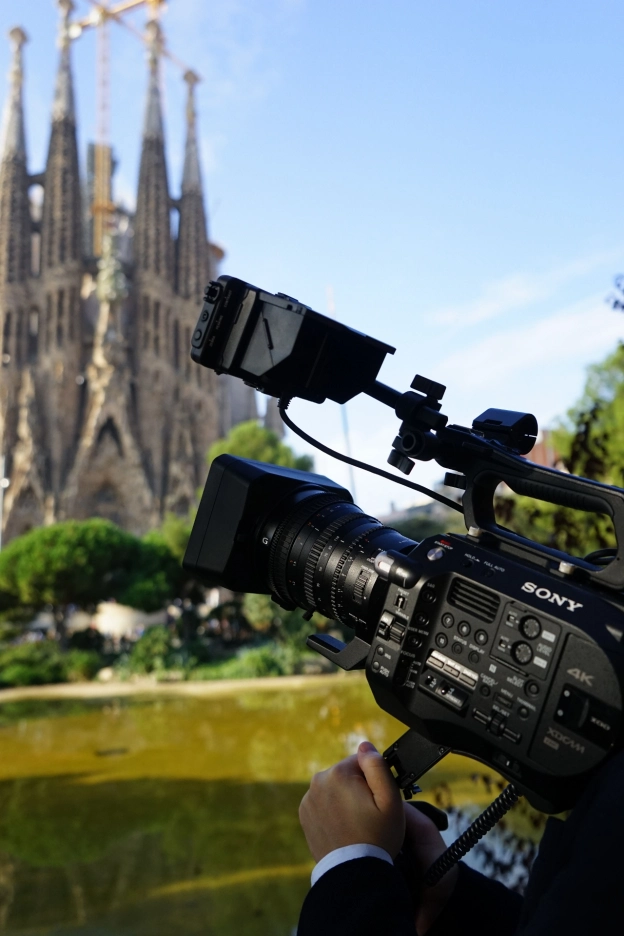
La PXW-FS7 se anunció -¡cómo pasa el tiempo!- hace ya dos años en el IBC. Recuerdo, que, meses antes, me había llamado la atención su diseño. Veníamos por aquel entonces de cámaras muy potentes, con sensores ya en tamaño Super35, pero con “configuración de cajita”: estaban pensadas para envolverlas en accesorios prácticamente desde el principio. Sí, me refiero a la PMW-F3 y, especialmente a las NEX-FS100 y FS700. Otras marcas, con mayor o menor suerte, iban por derroteros parecidos. Pero, de repente, algo nuevo aparecía. Ya estaba totalmente interiorizada la fiebre por el sensor grande. Ya sabíamos que podíamos reciclar nuestras “viejas” lentes mediante adaptadores y seguir sacándoles todo el jugo. Pero cuando me puse la FS7 en el hombro en septiembre de 2014, entendí que ese diseño tan curioso tenía una finalidad muy clara: poder trabajar con una cámara “con estética de ficción” de manera muy similar a una ENG de hombro… e incluso mejor.


Un año después se presentó la FS5. Mucha gente la consideraba la hermana pequeña, aunque, dependiendo de en qué nos fijásemos podría ser incluso superior. Lo más significativo fue el filtro de densidad neutra variable electrónico, visto por primera vez en camcorders de Sony en la PXW-X180/X160. Pero ahora iba más allá: podía cubrir totalmente un Super35.

pxwfs5_family_150728_28-Mid

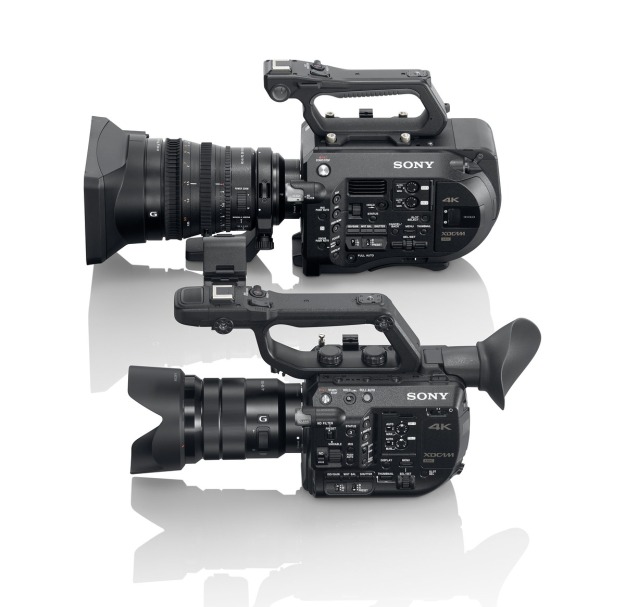
Comparación de tamaño entre una PXW-FS5K y una PXW-FS7K (no la FS7 II)

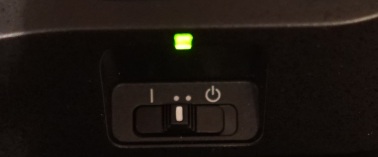
Y ahora, en 2016, tras recopilar –os lo aseguro- muuuuuuuchas opiniones de usuarios de todo tipo, la FS7 se ha renovado y se presenta la FS7 II.


dsc03255-1367x1920

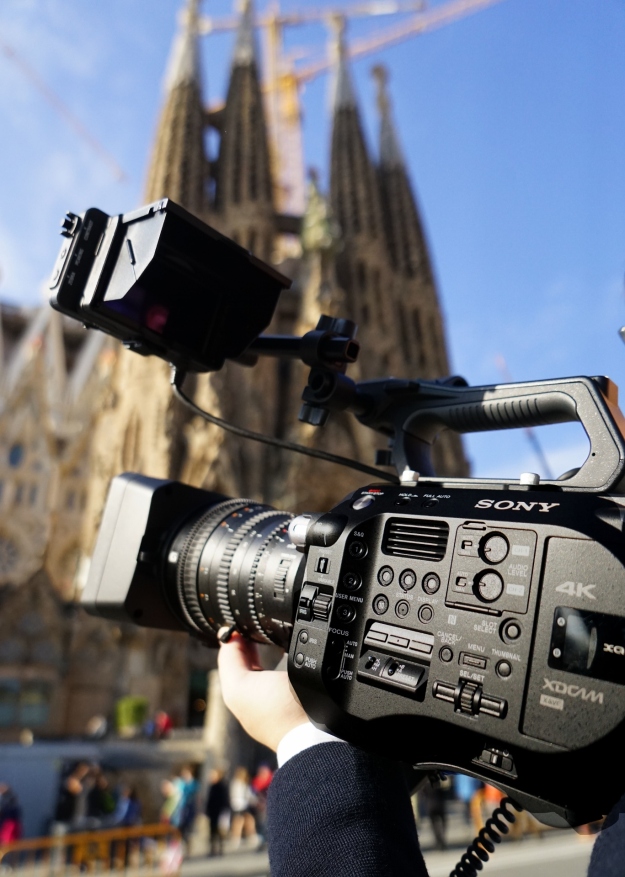
Un auténtico orgullo haber presentado la FS7 II por primera vez en Barcelona


FILTRO ELECTRÓNICO VARIABLE DE DENSIDAD NEUTRA

Como decía, el FEVDN (bueno, si no os importa, lo voy a llamar “el filtro ND”) significó un cambio drástico al incorporarlo en un sensor con formato “cine”: al pasar de un entorno a cubierto (vamos, un interior) a la intemperie, normalmente tenemos más luz. Los novatos como yo solemos hacer una de estas dos cosas: o cerramos iris (aumentando la profundidad de campo; una pena con un Super35), o cambiamos la obturación (variando la cadencia de la señal). Vamos, en ambos casos, cambiamos la estética de la grabación.

Pero el filtro ND nos cambia significativamente la situación.

Hay tres formas básicas de utilizarlo:

  1. Con las posiciones 1/2/3 de la torreta de filtros. En la FS7 esas posiciones llevaban los valores ¼, 1/16 y 1/64 serigrafiados. En la FS7 II no; podemos asignar el valor que queramos entre varias opciones, y así dejar, por ejemplo, 1/8 en la posición 1, 1/32 en la 2, y 1/64 en la 3. Viene muy bien cuando hemos podido comprobar previamente a qué posición queremos cambiar de manera muy rápida.
  2. Con un ajuste “analógico” (que no es analógico, pero da esa sensación): si el filtro está en alguna de las posiciones 1, 2 ó 3, podemos pasarlo a modo “variable” con un pequeño conmutador en el lado izquierdo de la cámara, y así podremos controlar mediante el dial que está justo al lado, o mediante el que tenemos en la empuñadura (se puede ajustar para hacerlo así), para ajustar el valor entre ¼ y 1/128 en incrementos lineales. Esto viene genial cuando queremos “jugar con la luz” que llega al sensor… ahí lo dejo, que hay muchas maneras creativas de sacarle partido.
  3. Con un ajuste automático. A mí me gusta asignar esa opción al botón “2”, también en el lado izquierdo. Así, la cámara controlará el filtro ND automáticamente para mantener, en la medida de lo posible (vamos, dentro de ese rango ¼ – 1/128), la luz que llega al sensor constante. Es decir, tú preocúpate del foco, no del iris o del shutter.

31-1920x1730

Vale, pero, ¿cómo funciona?

Casi todos sabéis cómo funciona un filtro ND externo: dos polarizadores lineales que, dependiendo del ángulo de giro entre sí, permiten pasar mayor o menor cantidad de luz. Pues bien, el filtro electrónico variable de densidad neutra es básicamente lo mismo, pero a nivel microscópico, y en lugar de rotar los filtros, se rota la luz entre ellos mediante una capa de cristal líquido.

electronic-variable-nd-filter-1260x733

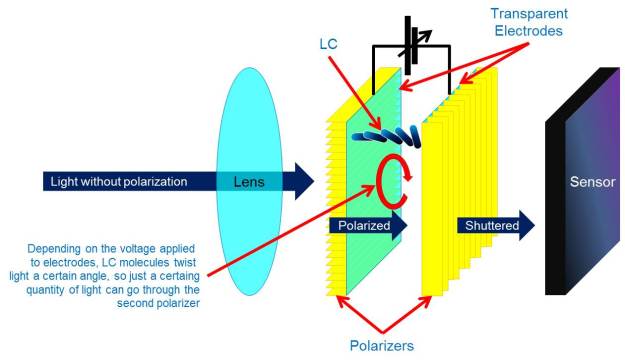
La luz viene de la lente sin polarización; se encuentra un filtro que la deja “peinada”. Luego atraviesa un electrodo transparente, la capa de cristal líquido, otro electrodo, y finalmente otro filtro de densidad neutra, que puede estar girado 90 grados respecto al primero (ojo, no sé exactamente si se mantiene con 90 grados o vuelta entera; es una explicación teórica). Dependiendo de la cantidad de voltaje que se aplique sobre los electrodos que rodean el cristal líquido, sus moléculas girarán más o menos, como si fuesen una hélice, girando en mayor o menor medida la luz que pasa a su través.


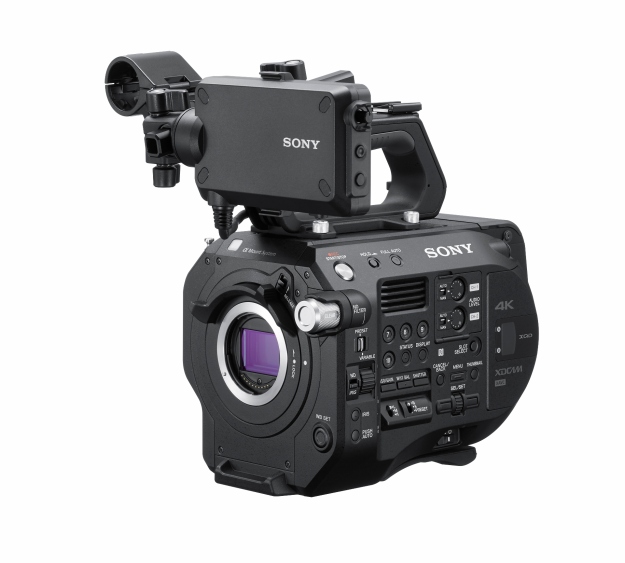
MONTURA E TIPO “LEVER LOCK”

La verdad es que no sé cómo traducirlo… ¿con bloqueo de rosca? Bueno, lo dejo en inglés.

Como sabéis, uno de los puntos fuertes de la montura E es que permite usar prácticamente cualquier lente del mercado, puesto que la distancia sensor-montura (“flange back”) es muy escasa, de tan solo 18 mm. Así, cada uno se “construye” su propia lente mediante un adaptador.

Pero en un entorno profesional como el broadcast o el cine, es muy habitual que esas lentes o bien sean pesadas y grandes, o bien estén “atrapadas” por varios accesorios, como barras, mattebox, follow-focus… y resulta difícil en algunos casos girar la lente para poderla anclar a la montura E.

Así que la solución ha sido adoptar una configuración parecida a la que tenemos en la montura PL: se inserta la lente frontalmente sin girarla, y se bloquea mediante un pasador circular.

19-1811x1920

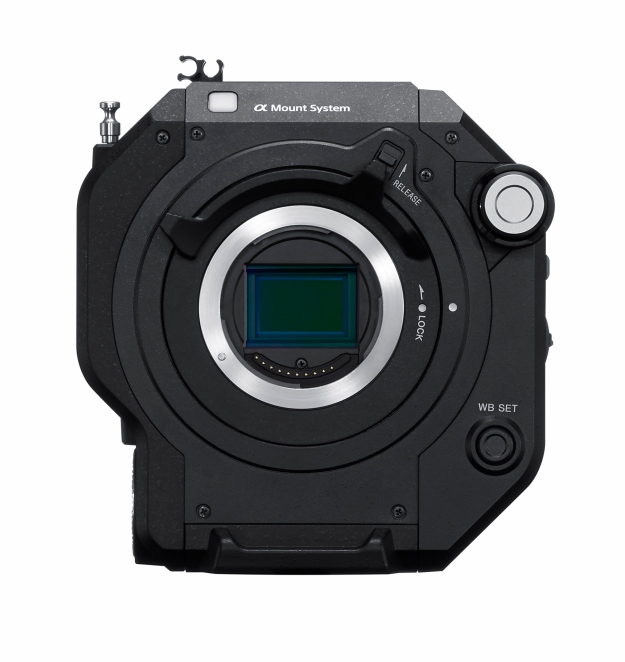
Confieso que las primeras veces me ha costado un poco acostumbrarme a montar y desmontar las lentes así, puesto que esta montura lleva un pequeño bloqueo para evitar que se deslice el anillo de fijación, y hay que pensar bien hacia qué lado hay que desplazar ese “collar” antes de pulsar el desbloqueo. Pero una vez usada, la verdad es que me gusta. Y mucho. Ah, y además tiene, obviamente, la interfaz para control de la lente e intercambio de datos con ella, y, como es lógico, todas las lentes con montura E se pueden montar.


MEJORAS MECÁNICAS

Prefiero englobar todas estas novedades “ergonómicas” de la FS7 II en un solo punto, para no fragmentar mucho este artículo.

En primer lugar, si recordáis cómo era el brazo de la FS7, llevaba por dentro dos tornillos que había que aflojar para extender o contraer la distancia entre la empuñadura y el cuerpo de cámara. Obviamente, era necesario un destornillador plano o una moneda, y no era muy práctico en caso de querer trastear rápidamente. Ahora, en la FS7 II, en lugar de tornillos tenemos palomillas en el lado exterior; de hecho, únicamente una de ellas fija la parte interior del brazo, lo que significa que, sin herramientas, podemos prolongar o contraer el brazo tocando una sola palomilla.

3-3_sider-1416x1920

La otra palomilla que veis es la que se inserta en la roseta Arri del lateral. Pero, si deslizamos un poquito el brazo, vemos que hay un agujero; si ponemos ahí esa palomilla, podemos poner el brazo paralelo al cuerpo de cámara, la empuñadura en la parte frontal derecha, y así trabajar de una manera muy similar a la FS5 para hacer contrapicados, con la cámara apoyada en nuestra barrigota.

Ah, y aunque suene gracioso poniendo el brazo hacia atrás, ¡podemos dejar la cámara en una mesa conservando su decencia, sin acostarla! 🙂

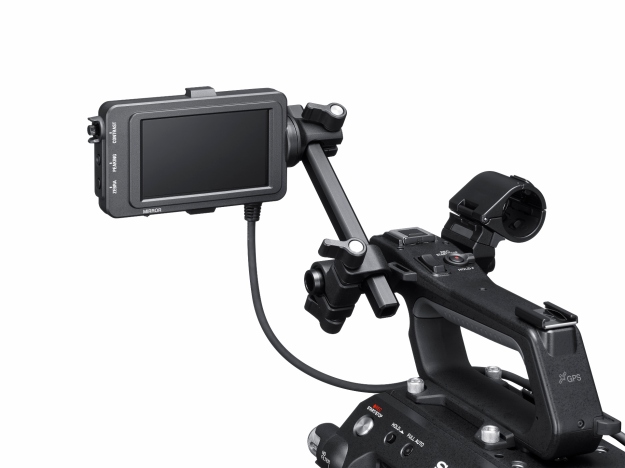
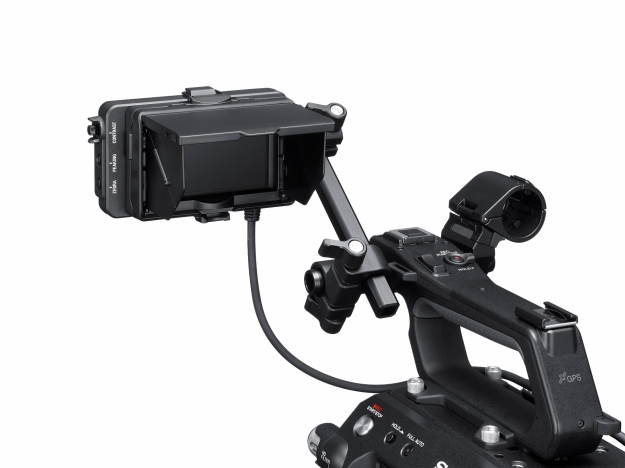
Ahora en el lado izquierdo, un detalle que ha cambiado bastante es el brazo que soporta la pantalla LCD. Muchos habéis comentado que, con el tiempo, y dependiendo de la humedad, de algún golpe, de la holgura que tenga… la pantalla LCD se suele “caer” en la FS7. Para evitarlo, en la FS7 II dicho vástago ya no es cilíndrico, sino de corte cuadrado. Así, no hay manera (civilizada) de que la pantalla se nos gire hacia abajo. Esa barra apoya sobre unos adaptadores que, a su vez, están encajados en las bisagras; si preferís usar barras de 15 mm, simplemente hay que retirar esos adaptadores.

25-1920x1440

Nos quedamos en la pantalla, y ahí hay otro pequeño detalle que nos hará la vida más cómoda. Si habéis intentado enganchar la “lupa” (el “eyepiece”, pero… ¿valdría monocular?) al LCD de la FS7, posiblemente os hayáis sentido un pelín torpes. A todos nos pasa; el hecho de tener que apretar casi a la vez la grapa superior y la inferior al final nos hace posar la cámara en una mesa o el suelo, y enganchar cada grapa con una mano. Pues en la FS7 II, la parte superior es un vástago fijo, que engancharemos primero, y es únicamente en la parte inferior donde tenemos que fijar el clip. Y lo podemos hacer con una sola mano, en un gesto más natural.

27-1920x1352

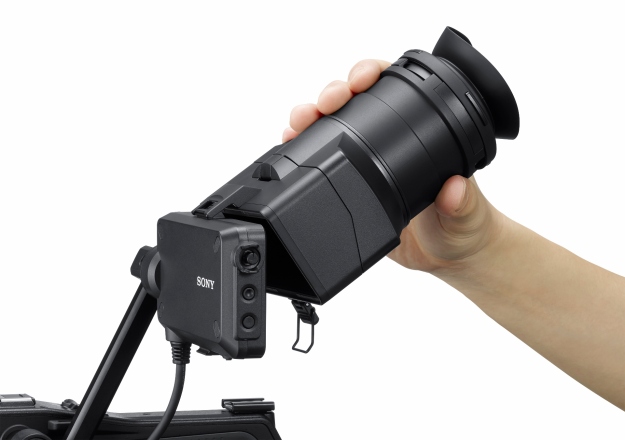
Aparte de ese monocular, ahora en la FS7 II se incluye una visera plegable que ocupa muy poco espacio al estar plegada, pero que nos ayuda mucho cuando estamos grabando en exteriores, para evitar reflejos. Insisto: se incluye de serie. Y la forma de asirla a la pantalla LCD es igual que el monocular, aunque la pestañita inferior que se usa para tirar del clip para fijarlo es más corta que la del monocular.

26-1920x1440

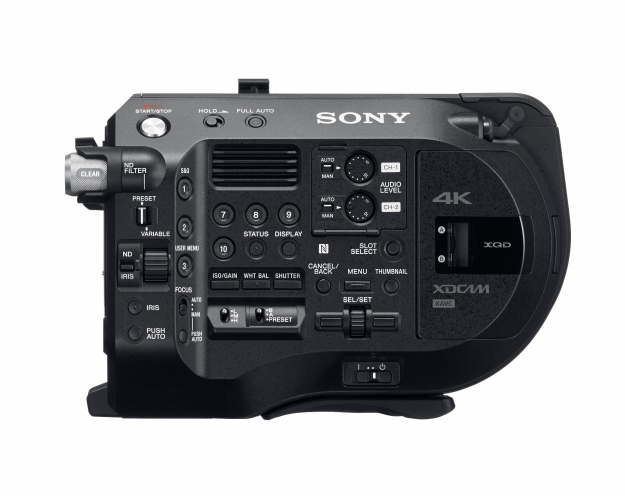
Otra parte que ha mejorado es la forma de extraer las tarjetas XQD. Si veis a algún videógrafo con las uñas extrañamente largas y puntiagudas, puede ser un guitarrista o un usuario medio de la FS7, puesto que el espacio que nos queda para sacar las tarjetas requiere de precisión milimétrica. Ahora en la FS7 II sobresalen 8 mm, lo que permite sacarlas sin necesidad de succionar. 🙂

29_w_xqd-1864x1920

Alguna FS7 nos ha llegado alguna vez con la tapa de la parte de audio rota: se la dejaron medio abierta, golpe, y ¡cras! La tapita de la FS7 II no se despliega en horizontal, sino que “cae” verticalmente, para evitar accidentes.

10-1920x1496

Por último punto de este apartado, hay una situación que más de una vez nos ha ocurrido: quieres empezar a grabar, pero no hay señal en la pantalla. Revisas que la cámara encendida…ok. Batería suficiente… ok. ¿Es posible que me haya cargado la cámara justo hoy, que tengo el rodaje más importante de mi vida? Desconectas el visor lo vuelves a enchufar, y voilá; eso era. No lo habías conectado bien. Pero a ver quién te quita el susto ahora. Pues bien, en la FS7 II, y aunque no sea la innovación más innovadoramente innovadora del mundo, hay un LED verde (no es muy intenso; no creo que genere reflejos incluso a oscuras) sobre el deslizador de encendido y apagado. Vaya historia os he contado para decirlos que tiene un dichoso LED de On/Off, ¿eh?
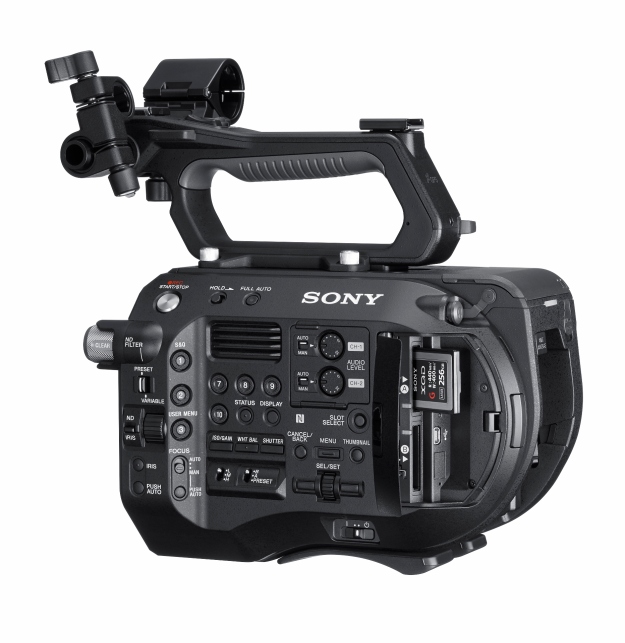
 

BOTONES ASIGNABLES

Llamadme raro (¡raro!), pero, personalmente, no soy muy amigo de usar pantallas táctiles en lo que uso como monitor. En el móvil lo sobrellevo con terapia, pero en una cámara me da mucha rabia ver grasaza o protector solar sobre la pantalla.

Vamos, que prefiero los botones. Y botones a los que no tenga que mirar para localizarlos ni presionarlos.

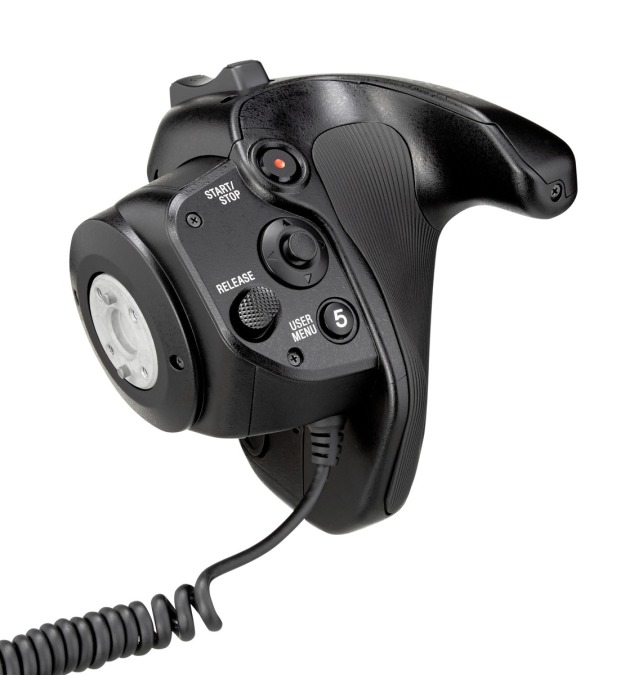
Pues eso es lo que hay en las FS7: botones asignables con forma de “donut” y con una ligera rugosidad en el “anillo” para poderlos localizar fácilmente. Pero es que en la FS7 II tenemos la friolera de ¡7 botones en el cuerpo de cámara! Si les sumamos los tres que tenemos en la empuñadura, nos ponemos en 10.

16-1920x1525

Como cabría esperar, a cada uno de esos 10 botones les podemos asignar las mismas funciones de que ya disponíamos en la FS7, más las relacionadas con el filtro ND. Como os decía antes, personalmente me gusta poner el botón de ND automático en el botón 2.

Asimismo, me gusta utilizar el «dial» de la empuñadura para ajustar el filtro ND, si es que no lo estoy utilizando en automático. La empuñadura sigue teniendo los mismos botones asignables (4, 5 y 6):
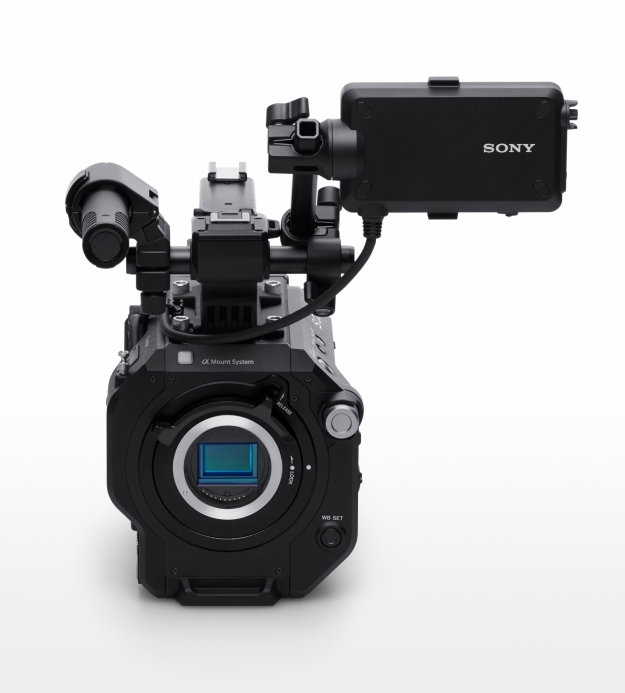
pxwfs7_others_20140815_025-1200


SENSOR

El sensor es exactamente el mismo que ya utilizábamos en la F5, FS7 ó FS5: un CMOS de tamaño Super35 mm, con resolución 4K y tecnología CMOS. No ha cambiado el espacio de color que es capaz de captar, pero sí se ha añadido un nuevo espacio de color sobre el que puede grabar, el BT.2020, que se añade al S-Gamut3 y al S-Gamut3.Cine de que ya disponíamos.

8_hero_mount-1730x1920-2

Este sensor, como ya sabéis, nos ofrece un margen dinámico muy grande (sí, HDR), que podemos aprovechar mediante las curvas S-Log2 y S-Log3. Una curva S-Log lo que hace, básicamente, es maximizar el margen dinámico de entrada al sensor (la luz que es capaz de captar) y sacarlo sobre un rango de salida limitado (voltaje o ceros y unos), principalmente comprimiendo las altas luces. La imagen parece muy “lavada”, pero en pospo podemos aplicar una curva “anti-Slog” para linealizar. Pero en las FS7 y FS7 II podemos aplicar unas LUT generadas externamente (por ejemplo, con el RAW Viewer) para poder monitorizar desde cámara con la misma estética que tendrá nuestra imagen final.

¿Que para qué sirve tener un margen dinámico tan grande? Por ejemplo, pensad en una escena en la que tenemos una habitación relativamente oscura con una ventana. Con un margen dinámico “tradicional” (alrededor de 6 stops), tenemos que elegir si exponer bien el interior y sobreexponer el exterior, o exponer correctamente la escena exterior y que se nos peguen la bajas luces en interior. Con una curva logarítmica podemos recuperar ambas zonas, y “narrar” ambas historias.

Además, la FS7 y la FS7 II ofrecen un par de funciones llamadas HiKey y LoKey, que nos permiten, en caso de no disponer de un monitor HDR, usar los 6 stops en la parte de altas o de bajas luces, respectivamente.

Eso sí, un pequeño consejo personal: mucho ojo con la Slog2/3, porque nos solemos acostumbrar alegremente a ellas, y acabamos usándolas en interiores. En ese caso, no es que la cámara sea ruidosa; es que la curva Slog tiene definido un ISO mínimo de 3200. Es decir, las bajas luces nos las estará levantando… y también parte de ruido. Muy orgánico, y muy “bonico”, pero ruido al fin y al cabo. Así que no la uséis para todo; usadla para lo que la necesitéis. Insisto: es mi humilde consejo.


CÁMARA LENTA

Las opciones de cámara lenta se mantienen igual que en la FS7: Full HD hasta 180 fps de grabación interna en NTSC, y hasta 240 saliendo en RAW.

De hecho, uno de los parámetros que nos indica lo bien que se comporta un sensor en lo referente a rolling shutter es la capacidad de hacer cámara lenta: si el tiempo de salida de la información del sensor es muy corto, también lo será, lógicamente, el tiempo que transcurre entre el comienzo de la primera línea y el final de la última. Así, las líneas verticales disponen de menor tiempo para desplazarse por el frame y “diagonalizarse”. Y, por otra parte, como el tiempo de extracción de información del sensor es muy corto, nos permite acercar el siguiente frame mucho más; “intercalar” más ciclos de lectura en el mismo período de tiempo.


GRABACIÓN

Internamente, la FS7/FS7 II es una cámara capaz de grabar hasta 422 con profundidad de 10 bits en resolución 4K con un códec XAVC-Intra. Como podéis imaginar, la cantidad de información a grabar por segundo es bastante elevada; en concreto, de 500 Mbps a 50p y de 600 Mbps a 60p.

También disponemos de códec XAVC en Full HD, y si estamos trabajando en un entorno broadcast, es muy habitual que se prefiera optar por el MPEG-2 422 a 50 Mbps (“XDCAM”), que, aunque menos eficiente, se lo tragan prácticamente todos los sistemas de edición.

Si, además, disponemos del adaptador XDCA-FS7, entre otras funciones disponemos de la posibilidad de retornar señal hacia la cámara para poder grabar en ProRes sobre las mismas tarjetas XQD.

qd_g256e-mid-840x1200

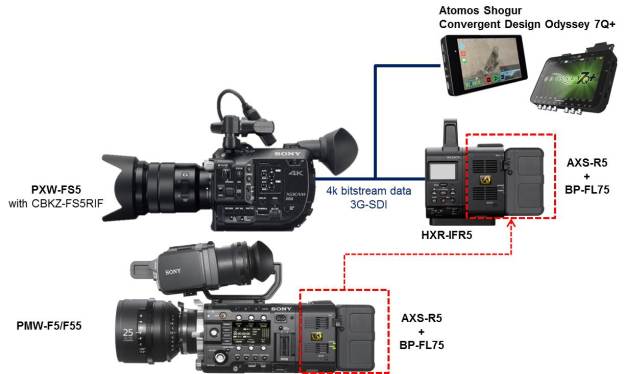
Y si preferimos sacar la señal en máxima calidad, podemos extraer la señal de la XDCA-FS7 en RAW, y grabarlo en: AXS-R5 (a través del HXR-IFR5), Convergent Design Odyssey7Q+ o dispositivos de Atomos. Ojo, porque en este caso, al igual que en la PXW-FS5 + CBKZ-FS5RIF, o el de la NEX-FS700R/RH, la señal no sale en RAW en banda base (un cable 3G-SDI no podría albergar esa señal en 4K), sino que se convierte a datos, y el cable SDI se utiliza únicamente como medio de transmisión, no como cable de vídeo. Por eso, en el otro extremo, necesitamos un equipo que decodifique la señal, y de ahí haga con ella lo que le ordenemos (grabarla en RAW, trascodificarla, mostrarla en el monitor del grabador…).


pxwfs7_side_20140815_011-1200

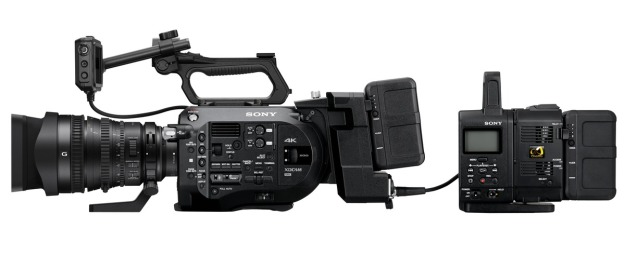
FS7 (no FS7 II) con XDCA-FS7 y sistema de grabación de Sony: HXR-IFR5, AXS-R5 y batería de olivina. Para la FS7 II es un sistema similar


CONECTIVIDAD

De nuevo, seguimos teniendo básicamente la misma configuración que en la FS7: dos salidas SDI, salida RAW con la XDCA-FS7 (también genlock, referencia, código de tiempos de entrada o salida, soporte para baterías en V, y entrada y salida de alimentación en continua), 2 entradas XLR de audio, y montura MI.

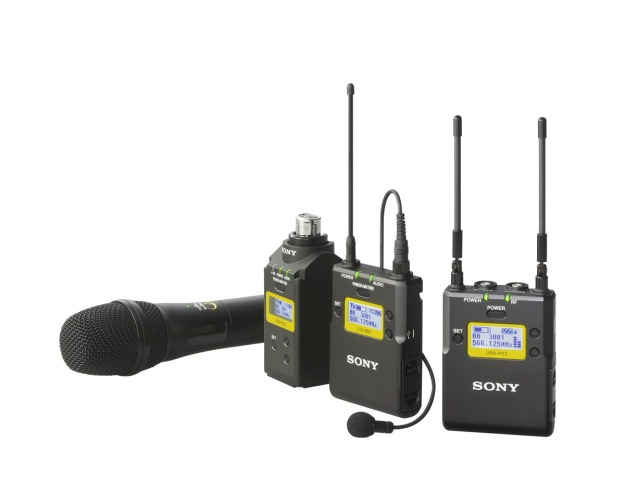
Esta montura MI (“Multi Interface” shoe) permite conectar, por ejemplo, un receptor de la serie UWP-D. Pero desde septiembre disponemos de receptores duales; es decir, a un único receptor montado en el adaptador SMAD-P3D, podemos conectarle dos transmisores; esto viene genial para entrevistas y eventos, por ejemplo. También tenemos, lógicamente, un micro interno en la propia cámara.

12_w_mic-1920x1469

Y recordad que la FS7 II, igual que la FS7, puede grabar 4 canales de audio.

uwpd11_family_131113_04-large-1200x952

En lo referente a conectividad WiFi, se suministra de serie el adaptador IFU-WLM3, que permite que controlemos desde el móvil la cámara a través de la aplicación Content Browser Mobile. Lo curioso es que no es necesario que metamos el SSID y la contraseña que nos proporciona la cámara, sino que, con la tecnología NFC, simplemente se “saludan” y se nos lanza la aplicación en el móvil/tablet (o nos lleva al sitio de descarga correspondiente).

También existe la posibilidad de conectarle un accesorio llamado CBK-WA100 que puede grabar proxies en una tarjeta SD, y transmitirlos incluso a través de un adaptador 3G/4G.


GRABACIÓN EN CACHÉ

Si estamos utilizando la FS7 ó FS7 II para noticias, no es raro encontrarnos en la puerta de salida de algún edificio esperando al famoso de turno. O a que un animalejo salga de su madriguera si estamos grabando un documental. Para estos casos, viene especialmente bien la posibilidad de grabar “el pasado”, lo que ya ha ocurrido. Para eso, por ejemplo en códec MPEG-2 existe la posibilidad de configurar la cámara con hasta 15 segundos de “pregrabación” que se pasarán a la tarjeta en el momento en el que pulsemos el botón de grabación, y a los que les seguirán los instantes posteriores a esa pulsación.


GRABACIÓN SIMULTÁNEA

Recordemos que la FS7 y la FS7 II tienen 3 botones de grabación: uno –plateado- en el cuerpo de cámara, otro en el asa, y otro en la empuñadura. Y, por otro lado, tenemos dos ranuras para tarjetas. Parece obvio que tener la posibilidad de operar sobre una de las tarjetas con un botón y sobre la otra con otro botón distinto es una ventaja tremenda; por ejemplo, imaginad un concierto o un partido de fútbol en los que tenemos todo el evento en trozos “grandes” en la tarjeta B, pero cada canción o cada “highlight” en la tarjeta A. Viene genial no sólo para recuperar algo que se nos puede escapar en la tarjeta A, sino también para sincronizar en edición en caso de estar grabando en multicámara.

Aparte, como es lógico, podemos configurar la cámara para que grabe lo mismo en ambas tarjetas (para tener un backup, o para empezar edición y corrección de color simultáneamente), y también una grabación continua en la que, si una de las tarjetas se queda sin espacio, se empieza a grabar en la otra tarjeta sin perder ni un frame; posteriormente se ensambla el clip al ingestar.
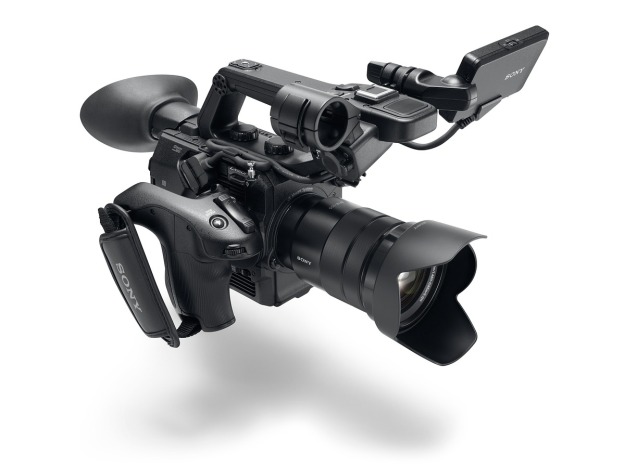
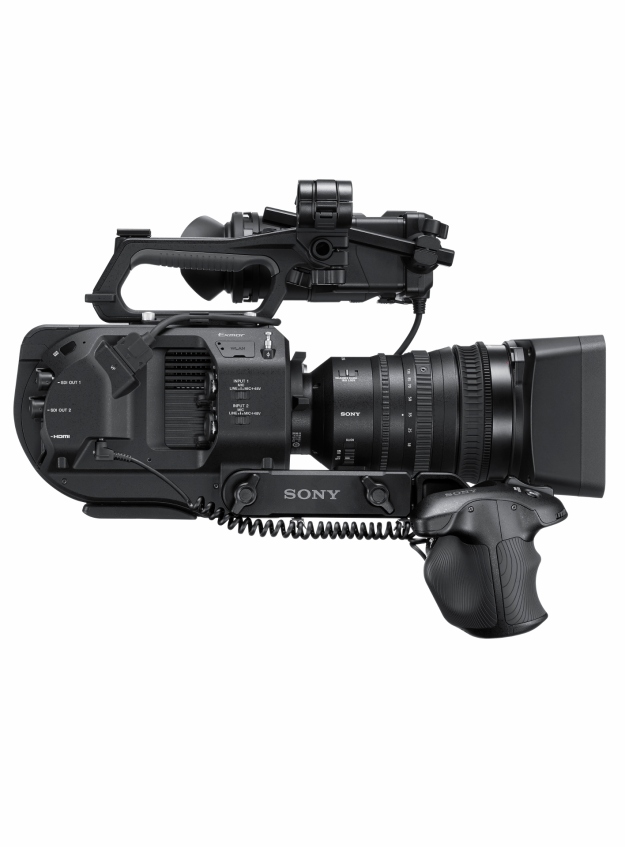
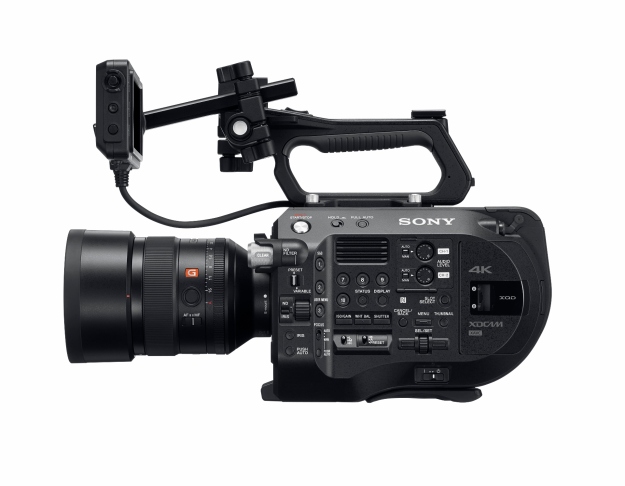
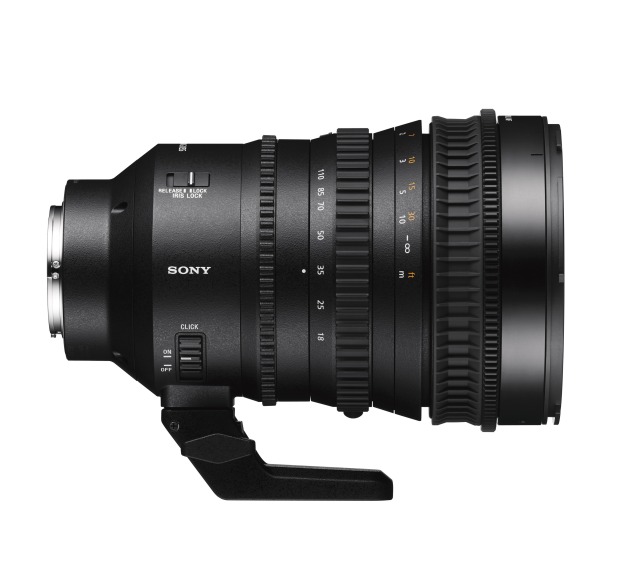
 

LENTE SELP18110G

Si habéis trabajado con la lente que venía en la PXW-FS7K, la SELP28135G, sabréis que en realidad en la FS7 se produce un efecto “tele”: perdemos una parte de la imagen que rodea al sensor, y nos quedamos con la parte central, puesto que esa lente está diseñada para encontrarse un sensor Full Frame como, por ejemplo, el de una Alpha A7S II.

Sin embargo, la SELP18110G está diseñada para sensores Super35 y APS-C (en Sony su anchura es igual), así que no tendremos que aplicar ningún factor de conversión.

selp18110g_a2_hood-large

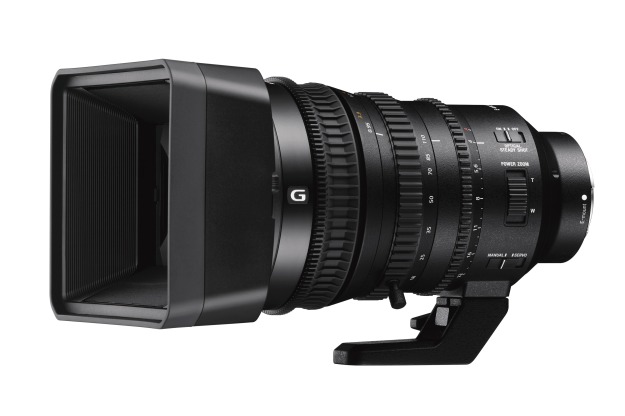
Se trata de una lente que se activa mecánicamente, así que no tendremos ningún pequeño retardo al operarla. Igual que la 28135, el anillo de foco se puede desplazar hacia adelante y hacia atrás para cambiarlo de manual a automático, pero en este caso lleva ranuras para poder aplicar una rueda dentada de follow focus sin necesidad de adaptador de correa.

La SELP18110G es una F4 en todo su rango de zoom. Puede parecer una lente un poco lenta en angulares, pero está pensada para que al hacer zoom se conserve una profundidad de campo proporcional, sin necesidad, por ejemplo, de retocar iris al abrir plano (y recibir más luz).

selp18110g_c2-large


OTRAS LENTES

Como ya creo haber comentado, la montura E de tipo “lock lever” simplemente cambia el modo de anclar la lente al frontal de la cámara, pero la distancia entre sensor y borde de la montura, así como las dimensiones del propio anillo, se mantiene. Es decir, podemos seguir utilizando las lentes con montura E (unas 74 actualmente), y, lo que puede resultar aún más interesante, prácticamente CUALQUIER OTRA LENTE DEL MERCADO, sea nueva, antigua, e incluso de menor diámetro que el propio sensor.

Así que tanto si venís de usar lentes EF de fotografía, como si tenéis sus precursoras, las FD, como si tenéis acceso a una buena colección de lentes PL, podéis usarlas sin problema en la FS7 II. Simplemente, tened en cuenta lo que he comentado de si están diseñadas para sensor FF, porque en ese caso quizá nos interese utilizar un adaptador con lente incorporada, para “cerrar” más el cono de luz y cubrir perfectamente el sensor Super35 (y, de paso, ganar 1-1,5 stops más). No entraré en si merece la pena tener una lente adicional en el adaptador para evitar perder angulares y ganar un stop; simplemente, quería mencionároslo (sí, hablaba del famoso Metabones Speedboster).

¿Y qué pasa si la lente es más “pequeña” que el propio sensor? Pues también tiene solución: en lugar de leer toda la superficie en tamaño Super35 y resolución 4K, podemos escanear sólo la parte central con resolución Full HD. Así, esas lentes de Super16 que tan buenos recuerdos traen, o las lentes de 2/3”, pueden funcionar sobre nuestra FS7 II “solamente” sacrificando resolución. De hecho, esto ya lo hacíamos con el “modo APS-C” en la A7S, pasando de FF 4K a S35 Full HD.


¿QUÉ VARIANTES HAY?

Posiblemente lo haya comentado antes, pero es un artículo un poquito largo como para releerlo ahora. Las dos referencias que habrá para la FS7 II serán:

  • PXW-FS7M2: sólo cuerpo de cámara
  • PXW-FS7M2K: cuerpo de cámara con lente SELP18110G

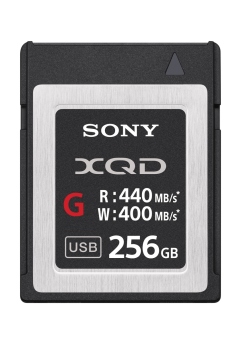
En ambos casos se incluye cargador de baterías, alimentador AC/DC, batería BP-U30 (la pequeña), la visera plegable, el monocular, el dispositivo WiFi IFU-WLM3… vamos, que lo único que tendréis que tener a mano es la tarjeta XQD; mi consejo es que vayáis directamente a la serie G o S para tener todas las funciones (todos los códecs).


Disculpad si el artículo esta vez ha sido un poco más largo de lo habitual, pero teniendo en cuenta las similitudes con la FS7, prefería entrar en algo más de detalle.

De verdad, espero que os haya servido esta entrada, así como el vídeo de mi canal de YouTube; nos vemos… donde sea J


Introduction to Sony FS7 II

More than two years ago, I received information about a new camera that we would announce at NAB2014. Specs were amazing and the body… my first impression from the photos was “weird”. That curved rear part, with an extensible arm, was really “new”, especially compared to the box-shaped modular bodies existing at that time, like FS100, FS700, F5…
But then I arrived to our booth, searching for it. And the moment I held the PXW-FS7 in my shoulder and grabbed the grip, I understood everything. I simply was willing to shoot.
One year later, FS5 arrived. Again, a little revolution: modular yet stand-alone, also extermely powerful, with the chance to use any lens, as we could do with FS series and E-Mount Alpha series. Tiny, with a similar grip to FS7, but without that arm… and with one nice brainchild: that electronic variable ND filter. Originally, it allowed us to assign different shutter values to its 3 position, and play with its value with the body dial or, even better, the grip’s one.

pxwfs5_family_150728_26-Mid
And now, 2 years later than FS7 was announced, we are glad to see how an improved FS7 will be living in parallel with the original model.
Say hello to FS7 II. I did it in my YouTube channel: https://www.youtube.com/channel/UCMUk_ztypSGRWw23mawsi0g

dsc03247-1280x1920


ELECTRONIC VARIABLE ND FILTER
As said, it was applied to the Super35 mm sensor in FS5, but, actually, it had been already used in PXW-X180 and X160. From my humble point of view, it’s fine to have it in a “news/ENG” handy model, but it is even better when used in a Large Format Sensor.
A LFS means, as you all know, basically a muche shallower depth of field.
A typical situation when shooting “reality” (documentaries, news…), as opposite to “fiction”, is that we don’t use to have the environment under our control, and that applies to light, too. So, imagine that you’re shooting in an indoor-to-outdoor situation: since light will probably be higher outdoors, we need to reduce it. A newbie like me would probably close iris. Or you can also adust exposure. But in both cases we are modifying the original picture aesthetics, as we’re increasing the DoF or changing the movie cadence, it’s “fluence”.
It’s very typical to use optical ND filters to avoid that aesthetics shift. But they use to be external (not controlled from camera body), and, obviously, one more parameter –and equipment- to bear in mind.
On FS5 and FS7 II Electronic Variable ND Filter we have 3 main modes:
1. Instead of the classical Clear / 1/4 / 1/16 / 1/64 filter wheel, now it is Clear / 1 / 2 / 3, meaning we can assign values as we want, from various shutter values. So, for instance, if you’ve been testing before the shoot and you realize that indoor it should be 1/8 but outdoors it matches with 1/32, you can assign those values to positions 1 and 2, making your shift much faster.
2. From any of those three positions (1, 2 or 3), if we switch the filter position to “Variable” instead of preset, we can adjust its shuttering value by a dial (from 1/4 to 1/128). Such dial can be the one in the camera body (also shared with Iris), or the grip’s one –which I prefer, personally-. Our creative chances are unique, thanks to that (imagine you can control surrounding light; you can modify DoF without light visible change.
3. The third mode is Auto mode: camcorder analyzes light approaching the sensor, and automacially adjusts ND filter so that we can have the same light level –in a certain limit, between 1/4 and 1/128. So, that indoor-to-outdoor travelling shouldn’t be a worrying factor any longer; you can keep the same DoF and the same shutter speed.

31-1920x1730

That invention is fine in concept, but how does it work?
Basically, it’s an LCD layer before the sensor. Light will have chaotic polarization when leaving the lens. Then, it’ll pass through a polarizer and a transparent electrode, an LCD layer, another electrode and another polarizing filter. The first polarizer “aligns” light so that it has a certain fixed polarization when leaving it –let’s say, horizontal polarization.

electronic-variable-nd-filter-1260x733

Depending on the voltage applied to the electrodes, liquid crystal mollecules will turn their position and will “twist light” (varying polarizing angle). Finally, a vertical –this is just an example- polarizing filter appears, and depending on such angle, light will be more or less capable to trespass that polarizer. Obviously, what camera (or we) actually controls is voltage applied to LC.

LEVER LOCK-TYPE E-MOUNT
As you know, one of the main advantages we have been showing since years ago (actually, FS100 was the first professional camcorder to incorporate it) is the capability to use virtually ANY lens over the E-mount. This is mainly due to the short flange back distance, between sensor and top of the mount. Since such distance is really short (18mm), users can “build” their own lens, via adapter. Or you can convert your Sony camcorder into any mount; you can see it also from this perspective.
In the professional market belonging to broadcast and cinema, however, we received a lot of feedback about E-mount: swinging the lens is necessary to attach it to the camcorder, and that is sometimes a bit difficult, especially when big broadcast lenses are being used, or the lens is surrounded by rod bars, mattebox, follow-focus… In that case, a straight installation is preferred.
And that’s what we got with the new Lever Lock-type E-mount: a white dot in the lens needs to be put in front of another white dot in the camera mount. Then, a lock switch can be released, and a collar will embrace lens bottom. Basically, such mechanism is pretty similar to PL mount (in fact, it is actually a Positive Lock attachment).

19-1811x1920
To be honest, the first time I used it I felt it a bit more complicated than regular E-mount. But after getting used to it, I simply LOVE it.

MECHANICAL IMPROVEMENTS
There are several improvements from FS7 in FS7 II, but instead of having a different section for each one, let me share the same space for them all. A lot of feedback has been taken in mind for PXW-FS7M2 (the official reference).
Firstly, the grip arm: if you have worked with your own FS7, this was not a real issue, but when the same camcorder was used by different cameramen, it was very likely to need different arm lenghts. And for such adjustment, a couple of screws needed to be loosen and tightened; thus, a screwdriver needed to be on set –nothing really nice if you use to fly-. Now, a knob is replacing those screws, so it’s much easier to get a proper arm length, and it can be done without the need to leave the camcorder holding in your arms.
As you can see, there is also a second knob; the one used for the Arri rossette. Now, that knob can be totally detached and inserted in another whole (hidden when the arm is totally folded), allowing you to use FS7 II in a lower position, laying in your belly as you could do with FS5, which is much more typical in fictional footages than an eye-heighted shot (normally for news/ENG).

3-3_sider-1416x1920
Oh, and by folding the arm towards the rear side, we can lay the camcorder in a table, not in “diagonal” layout  .

Also, a small but significant change can be found in the left side of the camcorder, close to the screen: instead of a circular rod bar for the LCD, now that bar is square-shaped. Some users, depending on the air humidity, tightening force, etc, could see in FS7 that LCD screen could “fold down” unintentionally, losing the horizontal position. Thanks to this square rod bar, and to the knobs for each adjustment, we can place the LCD screen in any position, strongly tightened in place. Also, if we are still willing to use 15mm rod bars, we can use it, because there are supplied rubber adaptors that convert 15mm circular holes into square ones.

25-1920x1440

There’s still another physical change in that part of the camera: in FS7, a couple of clamps needed to be attached to the rear part of the screen, to keep the eyepiece in place. Now, just the lower one is needed, as the upper one is simply a “clip” that we don’t need to tighten, but just to put in place. So, we can attach or detach the eyepiece with just one hand.

27-1920x1352
And that same way to attach/detach is applied to the new screen foldable hood that is supplied by default. FS7 II is a camcorder very likely to be found in outdoors shootings; that hood will allow us to correctly see the picture in the screen with lower reflections. Also, the small size when folded prevents us to carry the eyepiece just to put it open over the LCD.

26-1920x1440
In the card slots area a little improvement has been added: now, when the card is ejected, the part of it you can grab is 8 mm. Oh, by the way, talking about cards, what I strongly recommend is to use G or S series in order to get the best from the camcorder. That way, every codec, including 4K 10-bit 422 at 500/600Mbps can be registered.

29_w_xqd-1864x1920

Keeping in the left side of the FS7 II, and just a bit before the card slots, we can find the audio controls. In FS7, the audio cover would deploy horizontally, and some users, when not closing it perfectly, experienced the awful experience of breaking it when hitting from above. Now, even if anything drops and hits that cap, it opens twisting around a horizontal axis, so it will only –and presumably- open, but won’t break.

10-1920x1496

And, as a last improvement regarding physical aspects on FS7 II, there was a situation in FS7: if you simply connected wrongly the LCD bus and switched on the camera, you couldn’t know whether it was not working due to battery or any reason. Now, a green LED has been placed just above the power switch, allowing to easily observe if the camera is actually powered. Don’t worry about it: such LED is not very intense, so it won’t ruin your low-light footages.

dsc00655-1047x437

ASSIGNABLE BUTTONS
First of all, let me confess that I don’t usually like or use tactile screens. Simply, I don’t get the idea of putting your fingers on your monitoring system. Especially after eating a hamburguer or applying sunscreen. In other words: I prefer by far BUTTONS. And especially those buttons that I don’t need to look at to locate or push.
As we had on most of Sony camcorders, there are assignable buttons. And, like in FS7 or FS5, in the camera body they are ring-shaped and with a little “extrusion” across the ring. This allows cameraman to easily find them just but slightly touching with his/her fingertips.
But in FS7 we had 3 assignable buttons in the grip (yes, button #6 is that one that took a while to find) and other 3 in the camera body, in its left panel.

pxwfs7_others_20140815_025-1200

Now, in FS7 II, we have 4 MORE, making a total of 10 assignable buttons.

16-1920x1525
In my case, I prefer to use S&Q for direct access to Super Slow Motion (without passing through the “normal” S&Q), but in button #2 I use to assign Auto ND function; yes, obviously, we can assign the same functions as in FS7 + the ones related to ND filter.

SENSOR
FS7 II’s sensor is exactly the same as F5, FS7 or FS5: a Super35 mm sensor with CMOS technology, very fast readout, and 4K resolution.
Color space, thus, keeps the same, but now the chance to record over BT.2020 has been added, additionally to the original S-Gamut3 and S-Gamut3.Cine.

8_hero_mount-1730x1920-2
As you perfectly know, this HDR sensor can maximize its huge dynamic range via S-Log2 and S-Log3 gamma curves.
Just for reference, the cause to use a S-Log curve is because we want to “adapt” all that big dynamic range into a limited output (voltaje or digital values). If a linear curve is applied, saturation can be reached in a short input range (for instance, in 709 gamma curve, despite it is not purely linear). In a S-Log transfer, up to 1300% dynamic range can be acquired, and while low lights keep linear-ish, high lights are compressed. The aesthetics we could see are like “flat” or even “overexposed”, but we could apply an “anti-Slog” curve to linearize signal and recover the whole dynamic range that was captured. In case we need a “natural” look in our monitors (either because we are not totally use to visualize S-Log materials, or because we want to evaluate the final result), we can apply a 1D or 3D LUT, even designed by us (e.g. via RAW Viewer).
Nice, but… what is that wide dynamic range useful for? Imagine a scene in which we have two “stories”: one of them happening in a room, with low lights. Another one is happening outside, and could be seen through the window. With a SDR camera (about 6 stops), we would need to “choose” between both stories: the one happening in low lights- with the window overexposed-, or the one outside –and the inside one would be with stick blacks-. Through a HDR camera, we can record BOTH stories; in postproduction, we can simply apply that mentioned LUT to recover both materials. Or, even, if you’re shooting outdoors, clouds won’t be just flat white, but all their grey tones can be recovered.
There’s also a very useful function in FS7 II and FS7: HiKey y LoKey allow us to use a SDR range (for instance, because we might be using SDR monitors, not HDR) in either high or low lights. Thanks to that, we can evaluate both ranges of the images even if the rest of the equipment is not totally HDR-ready.
And now let me give a personal tip: once we have used S-Log curves, we feel “relaxed” because we can recover all the info, even if it seems overexposed. Then, we get used to work with them, and suddenly we get into a low-light environment, and experience the surprise to see that our image is a bit noisy. OK, very “organic” or “filmic” noise… but noise. That’s because S-Log curve is defined by standard to work with a minimum ISO3200 which means that for lowest levels, a minimum gain is applied. It’s not a problem in your camera; it’s a matter of how S-Log is defined. So, that is my tip: use S-Log if you need it, which doesn’t necessarily mean “always”.

SLOW-MOTION
Slow-motion features keep the same as in FS7: up to 180fps in Full HD resolution in NTSC mode, and up to 240fps with RAW output.
In fact, that’s a good indicator when we want to know how a camera behaves with rolling-shutter derivated effects: having a super slow-motion module means that sensor can be read fast enough to include much more frames in the same time period. So, if that readout is fast, the time that exists between the first and the last line in a frame is also very short, and, thus, jelly and banding effects are minimum.

RECORDING
FS7 II and FS7 can record internally up to 422 colour sampling, 10-bit, 4K-resolution over a XAVC Intra codec. As you can imagine, such big quality requires an according bandwidth, which is 500Mbps at 50p and 600 at 60p.
In a broadcast/news environment, it is very likely to find MPEG-2 (“XDCAM”, despite that’s not the codec, but the product family) capable systems. Despite XAVC offers better quality at the same 50Mbps, it’s a reality that MPEG-2 is, as of today, the de-facto codec in broadcast stations. So, for those needs, in Full HD resolution there is also the chance to record MPEG-2 422 10-bit, and not only XAVC.

qd_g256e-mid-840x1200
All those codecs can be registered over XQD cards in the internal recording. But in case we use XDCA-FS7 adapter, there’s also the capability to record over ProRes. And, of course, XDCA-FS7 allows us to output RAW data stream from FS7 II.
Some of you may wonder: if FS7 II/FS7’s BNC connector is 3G-SDI, which allows a maximum of 2K/60p quality, how could a 4K/60p/50p signal be outputted? Well, actually, 4K signal is not actually outputted but “transmitted” after a conversion into data. So, baseband video is not routed throught the SDI connector; that cable is just used as a transmission system for data.

pxwfs7_side_20140815_011-1200

Bear in mind this is actually FS7 in RAW configuration: XDCA-FS7, V-mount battery, and at the other side of BNC cable: HXR-IFR5, AXS-R5 and olivine battery. FS7 II would be similar

That is why we need a device at the end of the cable that is capable to DECODE such signal, not only to record it. And for that, there are actually 3 ways: HXR-IFR5 + AXS-R5 from Sony, Atomos devices or Convergent Design Odyssey7Q+. After that conversion from data to RAW signal (done in HXR-IFR5, for instance), signal can be directly recorded in RAW (in AXS-R5), or transcoded into another format (in Convergent Design’s or Atomos’ equipment).


CONNECTIVITY
It’s exactly the same configuration as we had on FS7: a couple of SDI outputs, RAW output via XDCA-FS7 (together with genlock, reference, timecode in/out, V-mount batteries support, DC input and output), two XLR inputs and MI shoe.

12_w_mic-1920x1469

URX-P03D dual receiver installed in FS7 II via SMAD-P3D

That MI shoe (Multi-Interface) allows to connect, for example, a receiver from the UWP-D series. But, since September 2016, we have dual receivers available: an unique receiver to which we can connect two transmitters. That receiver would be connected to FS7 II via SMAD-P3D adapter. This solution is great for interviews, ENG or documentaries. There’s, obviously, an internal mic, which means a total of 5 inputs (2x via XLR, 2x via SMAD-P3D and 1x internal) that can be addressed to the 4 audio channels that FS7 II and FS7 can record.


uwpd11_family_131113_04-large-1200x952

Related to Wi-Fi, a dongle called IFU-WLM3 is supplied by default, allowing us to control the camera through Content Browser Mobile app. But, in order to make things easier, it’s not even necessary to log into camera’s SSID and to input its password; we can simply «touch» the FS7 II left part with our smartphone/tablet, and, if NFC is switched on, both devices will «start the conversation» via Wi-Fi (or the app dowload site for CBM will launch).

Also, there’s the chance to connect CBK-WA100, an external device that allows proxy recording and upload even through 4G/3G dongle.


CACHE RECORDING

When in a news environment, it’s not a strange situation being in front of a gate through which some VIP may come. Or, in a documentary, it’s a typical situation to be waiting for some animal to leave some hole or jump from a branch. With FS7 II, as with many other Sony XDCAM camcorders, a buffer is available, to allow us to recover up to the past 15 seconds, and continue the footage from the momento that REC button is pressed. This can be done, as said, with up to 15 seconds in MPEG-2 codec. So, you can simply «let things happen», and the contents will be ready then.


SIMULTANEOUS RECORDING

In FS7 II and FS7, a total of 3 REC buttons can be found: one -silver- in camera body, another one in the handle, and a third one in the grip. On the other hand, we have two XQD card slots. So, we can have 3 different configuations for those cards:

  1. Simultaneous REC: both cards will have the same contents, whatever the REC button we use. Nice for backups, or for addressing one card for edition and another for colour grading, for example.
  2. Continuous REC: since XQD cards are not as affordable as, let’s say, SD cards, it’s worth maximizing its capacity. This recording mode allows us to keep recording in a second card when the first one has run out of space, without any frame loss.
  3. (The most interesting one, IMHO) Independent REC trigger: imagine you’re shooting a live concert, and you wish to have the whole act in one card, and each of the songs on a separate clip. You can command one card with one of those 3 buttons, and the other one from another button. That’s useful not only for avoiding losing some relevant highlights, but also in case you’re shooting in a multi-camera environment, and you need to synchronize all footages.


LENS: SELP18110G

In case you’ve shot with the lens bundled in PXW-FS7K, called SELP28135G, you’ll have noticed that there’s some «tele» or «zoom» effect when recording: that lens is designed for a Full Frame sensor (as that of A7S/A7S II), and, thus, when a Super35 mm sensor is placed behind that lens, the capturing surface is smaller than light’s circle diameter, and we keep only the central part of the image.

selp18110g_a2_hood-large

Now, SELP18110G has been designed for Super35 and APS-C (Sony) sensor size, meaning that there will be no need to «convert», and the lens will provide a proper light diameter to the imager.

SELP18110G is also faster in response: when using the lens rings, they directly act over the optical mechanism, with immediate response. As we’ve seen in many Sony camcorders, we can easily switch from manual to auto focus by simply moving forward/backwards the focus ring, which, btw, now includes a «knurled» ring proper for mattebox directly, without belt.

selp18110g_c2-large

Its aperture is constant F4; despite it might seem a bit dark when in wide angle, having a constant aperture simplifies operation regarding focus. In a classic lens, when shifting from tele to wide angle position means more light coming into the sensor, and, thus, a correction needs to be done -normally, over the iris adjustment-, so DoF or shutter needs to be modified, which involves an aesthetic payload (as we explained for the ND filter). But with a constant F4, no correction is needed, and DoF and fluence will remain the same along the whole zoom ratio.


OTHER LENSES

Despite Lever Lock-type E-mount involves a new way to attach lenses, all E-mount lenses (as of today, around 74) can be inserted before FS7 II. And, obviously, also lens adapters.

As distance between sensor and mount is small (remember: 18mm), each user can «build» his/her own lens via adapter. So, virtually ANY LENS CAN BE ATTACHED. And I say «any» because, even if FS7 II’s sensor would theoretically vignette when a narrower lens is used (e.g. a Super16 lens), a center scan mode can be applied to «crop» the signal and only read the central part. That could also be seen in A7S II, by the «APS-C mode», reducing its FF size into an APS-C/S35.

So, not only high-grade PL lenses can be used, as well as «vintage» FD or newer EF lenses, but also S16 or even broadcast 2/3″. In case you want to «recover» that light that would be lost by using full frame lenses, there are some adapters that can «correct» that effect by closing lens circle via another lens inside the adapter ring. So, no correction factor needs to be applied, and up to 1-1.5 stops can be earned – that’s the Metabones Speedbooster, and I won’t start a discussion about having an additional lens between a high-quality lens and your sensor.


AVAILABLE KITS

As for most of the interchangeable lens camcorders, two kits will be offered:

  • PXW-FS7M2: body only
  • PXW-FS7M2K: camera body + SELP18110G

In both cases, accessories are supplied: battery charger, AC/DC converter, BP-U30 battery pack, foldable hood, eyepiece, IFU-WLM3 Wi-Fi dongle…. You’ll only need to buy a XQD card to start shooting (remember to buy G or S series to be able to record in every codec).


Sorry for writing such a long article this time, but as you can see, there are both significant and subtle differences between FS7 II and FS7, and didn’t want to miss a lot of them when the camcorder finally reaches the market.


I really hope this was useful for you; a review video can also be found in my YouTube channel, and you can keep updated via my Twitter account, so see you there!

🙂


.


FS RAW upgrade for FS5 announced at NAB

Hi all again! Very exciting news these days…

Maybe you’ve just heard/read it in the typical NAB announcements or via social media ( https://youtu.be/WnitX19JZeo?t=2m50s ); the expected (and announced since the beginning) «FS RAW» upgrade for PXW-FS5 («CBKZ-FS5RIF») will be available soon. Very soon. So, let’s see what it means.

pxwfs5_3q_150728_09-Mid

FS RAW? AND 4K? BUT… THAT’S A LOT OF BPS!

I’m sure some of you have heard, or, even better, have worked on NEX-FS700 and/or PXW-FS7. For you, this announcement will probably something «natural», and nothing that I’ll explain here will be really new.

As you may know, through a 3G-SDI interface (the main output, together with HDMI, in FS5) the maximum picture format that can be transmitted is 1080/50p (or 60p). However, it a 4K resoution needs to be sent, we would need a minimum of 6G-SDI connector.

However, this announcement (as years/months ago with FS700 and FS7), means that a 4K RAW signal can be delivered through that BNC connector. So… how????

In NEX-FS700, a little piece of hardware upgraded needed to be installed. In PXW-FS7, a camera adaptor needs to be attached to the camera body, XDCA-FS7. This time, for PXW-FS5, we simply need a firmware upgrade that can be done by end-user (but not as «simple» as a regular FW upgrade).

But those three models share the same kind of communication: through that BNC connector. Instead of sending the video in baseband, such video signal is converted into data and then encoded (under Sony proprietary protocol) and sent in data stream into the receiver.

OK, IT’S DATA, BUT HOW TO DECODE?

The first solution that existed for recording RAW from a FS700 was AXS-R5. However, R5 was a recorder that was mainly designed to be fitted in the rear part of PMW-F5 or PMW-F55. It receives signal from a multipin connector.

So, an intermediate hardware is needed: HXR-IFR5. This interface has a triple function:

  • physical connection (it «emulates») the rear part of a F5/F55
  • operation over R5: in F5/F55 operation is done via camera body. Here we’re missing such interface, so a set of buttons is needed.
  • decoding FS RAW signal: as said, that data stream encoded under Sony protocol needs to be converted into «video signal», so that R5 receives it through its multipin interface.

This was the first way to record RAW from FS700, and it can be also used for FS7 and FS5. The only problem for some customers in this case could be the price: HXR-IFR5 + AXS-R5 + olivine battery + AXS memory + AXS memory reader can cost the same price (more or less) as the whole FS7.

FS5 RAW

So, some third-parties appeared; they held conversations with us, so that they could get access to the FS RAW protocol. Their typical workflow is to capture the FS RAW data stream and then convert it into a more «light» codec (despite it can also be RAW). They usually work over HDD or SSD drives, and use to provide also a monitoring solution. Obviously, the price is also smaller: about 1/4-1/3 of Sony’s solution. As you may have guessed, I was talking about Convergent Design with their Odyssey7Q/7Q+ recorder and also Atomos Shogun.

WHAT ELSE CAN BE ACHIEVED WITH FS5’s RAW UPGRADE?

Well, as you may expect from a camcorder that can reach up to 240 fps in Full HD, the FS RAW upgrade also improves the super slow-motion capabilities.

As you know, default super slomo feature in FS5 (and in FS7) works over a buffer. That’s why it is «cached»: about 8 seconds if shooting at 240 fps. Now, this «caché way» is only applied if we shoot 4K at 120 fps, in which we’ll have 4 seconds burst. That means that, if at 24p recording, we are shooting 120/24=5 times faster, which means that those 4 seconds are «time stretched» to 20 seconds. In 4K in RAW quality, not bad 😉

And regarding 240 fps, now there wouldn’t be time limitation if shooting in RAW; this means we can reach a «continuous» mode without caché.


According to my information, this upgrade will NOT be free of charge. Also, the procedure will be very similar to the one you should follow to convert your X70 into a 4K camcorder. Oh, and don’t forget you will need to update your FS5 into V2.00 (not available at the moment of publishing this entry) in order to be able to upgrade with CBKZ-FS5RIF.


Thanks for reading, and I really expect this little explanation is useful.

Regards!

Presentación de la Sony PXW-FS5

Hola a todos.

Antes de nada, quizá os interese echar un vistazo a este vídeo: https://youtu.be/eFL13KItg7I y, sobre todo, a este otro, que básicamente explica lo mismo que describo en este artículo: https://youtu.be/KA0fjcJ6DBE

Como sabéis, hace apenas unos minutos se ha anunciado, tras una semana de “teasers” o avances (con las etiquetas #NoLimits y #MissingPiece), y tras meses de trabajo (qué gran equipo) la PXW-FS5:

Imagen de la nueva PXW-FS5K (con lente). Modelo sin lente (PXW-FS5) también disponible

Imagen de la nueva PXW-FS5K (con lente). Modelo sin lente (PXW-FS5) también disponible

La expectación era grande, a pesar de haber tenido sólo una semana de “agitación”. Y hoy, al fin, ya están todas las cartas a la vista.

Muchos de vosotros seguramente habréis trabajado o, al menos, conoceréis los dos modelos a los que voy a hacer referencia con frecuencia en esta entrada: la PXW-FS7 y la NEX-FS700.

Suelo comentar en mis presentaciones que esas cámaras, pese a tener algunos rasgos en común, pertenecen a dos generaciones distintas: la FS700 –como la NEX-FS100- físicamente se podría definir como “una caja con un excelente sensor”. Obviamente, es mucho más que eso, pero en lo que se refiere a ergonomía, es la primera generación: lo primordial eran la calidad del sensor, la compatibilidad de lentes, y las prestaciones de la cámara. Pero ergonómicamente, eran necesarios ciertos accesorios para poder trabajar de una manera “tradicional”, para “agarrar” la cámara con comodidad. Y, por ejemplo, la pantalla LCD era difícil de visualizar al hacer planos picados (posible solución: cámara dada la vuelta, y a invertir en pospo 😛 ).

La NEX-FS700RH; aún tiene mucho que ofrecer

La NEX-FS700RH; aún tiene mucho que ofrecer

Sin embargo, la evolución hacia cámaras con sensor grande, con altas prestaciones, pero además con una cierta ergonomía se empezó a vislumbrar con la llegada de las series “F” (F5 y F55) y su cuerpo modular: ya se podía trabajar con ellas en hombro, y a la vez se les podía adosar cualquier tipo de accesorio (follow focus, mattebox, rig, steady…) para una configuración de cámara fija.

F55 y su diseño totalmente modular

F55 y su diseño totalmente modular

La que posiblemente revolucionó este mercado en lo referente a ergonomía fue la PXW-FS7, desvelada ahora hace un año: toma “lo mejor de ambos mundos”. Por un lado, es compacta, manejable, con un uso relativamente sencillo –tanto para gente “ascendente” desde una FS700, como para gente “descendente” desde una F55, e incluso para aquellos que finalmente se decidieron a renovar su flamante EX3, EX1, 200…-, y por otro, mantiene esas altísimas prestaciones que veíamos en la F5, con montura E, más “habitual” y que requiere adaptadores más fáciles de encontrar. Además, las lentes que típicamente se utilizan sobre montura E (que pueden ser prácticamente CUALQUIERA, puesto que la distancia de “flange” –sensor-montura- es muy corta, de tan solo 18 mm) suelen ser más ligeras, lo que casa perfectamente con la FS7.

Distancia

Distancia «flange back»: entre sensor y borde de la montura

Obviamente, la FS7 es el objeto de deseo de gran cantidad de usuarios: flexible, potente, bien diseñada, robusta… e incluso económica. Pero a pesar de su reducido precio, hay usuarios que prefieren seguir con herramientas más “antiguas”, bien por concepto, o bien por edad, como las DSLRs, y consideran que trabajar con una cámara de fotos grabando vídeo “se apañan porque es más barato”. No les quito la razón, pero también hay que considerar que el cuerpo de cámara y los accesorios necesarios para “convertirla” en cámara de vídeo realmente utilizable acaba poniéndonos en presupuestos que pueden igualar el precio de una FS7. Así que eso de que “por el precio de una FS7 me compro dos Full Frame” es muy discutible.

Así que, vale, aceptamos que para algunos clientes el precio de una FS7 puede todavía resultar un poco elevado. O que una segunda cámara para la FS7 nos vendría muy bien en el rodaje, pero no disponemos del doble de presupuesto. O que hay situaciones en las que una FS7 puede ser “demasiado” (demasiado “aparatosa”, demasiado “grande”…). Por ejemplo, una FS7 nos sirve prácticamente para todo, pero en una boda quizá contar con algo incluso más ágil puede ser una mejor opción. O para los nuevos creadores para los medios “online”, como los “YouTubers”: ya no sólo es poner una cámara enfente, sino además poder contar con una estética cinematográfica, que no nos saque todo de foco, y que sea económica. O para un dron: arriesgar una FS7 es mucho arriesgar, y es más conveniente un cuerpo de cámara lo más ligero posible.

Pues para todas esas ocasiones en las que no podemos “llegar” a una FS7, o sea más conveniente algo más pequeño, es para las que se ha diseñado la PXW-FS5.

PXW-FS5

PXW-FS5

ERGONOMÍA

El cuerpo, sin ningún accesorio, pesa únicamente 0,8 kg (el chasis es de magnesio), y es totalmente modular. Por eso comentaba que no será raro encontrar la FS5 montada en drones, grúas pequeñas, carcasas submarinas… porque, además, el tamaño es realmente pequeño, sobre todo comparándola con una FS7:

Comparación de tamaño entre una PXW-FS5K y una PXW-FS7K

Comparación de tamaño entre una PXW-FS5K y una PXW-FS7K, pero en la foto no se aprecia tanto la diferencia de tamaño real

Como ocurría en la FS7, tanto la pantalla como el “mando” (¿me dejáis llamarlo “grip”?) son desmontables y la cámara puede funcionar igualmente. Esto significa que para planos en espacios realmente cerrados (coches, armarios, neveras, ascensores), podemos tener el cuerpo de cámara y el “control” (pantalla y grip) unidos únicamente mediante los cables, pero no es necesario que lo estén mecánicamente. Así que la cámara puede descansar en nuestras piernas o en algún herraje mientras la controlamos desde un lado.

La FS5 es modular. MUY modular

La FS5 es modular. MUY modular

Además, aunque se puede adaptar el brazo de la FS7 (habría que comprar algunas piezas como recambios), el grip va montado directamente sobre el cuerpo de cámara, y el centro de gravedad de la FS5 está en una posición muy baja y ligeramente desplazado hacia el lado derecho, de modo que la cámara no nos “girará” tanto (ya no dependerá tan drásticamente de la lente que montemos, obviamente). O para posiciones “picadas” en las que tenemos que elevar la cámara (en eventos con gran aglomeración de gente, como en un concierto, una boda, etc), nuestro antebrazo sufrirá menos agotamiento que con las cámaras de mano clásicas.

FS5 con el brazo de la FS7

FS5 con el brazo de la FS7

Por supuesto, el propio grip permite la navegación por menús, y su giro en el plano vertical se puede bloquear y desbloquear para situarlo en el ángulo adecuado en cada momento, de modo que la cámara se pueda manejar totalmente con la mano derecha, dejando la izquierda para manejar la lente (básicamente, el foco, porque si es una lente remoteable, podríamos tener el zoom en el servo de zoom del grip, y el iris/obturación en el potenciómetro del propio grip).

Aquí podéis ver el control de zoom y el potenciómetro/dial asignable (típicamente, para iris)

Aquí podéis ver el control de zoom, el potenciómetro/dial asignable (típicamente, para iris), y un botón asignable para el dedo corazón

Y aquí veis, de arriba a abajo: zoom, bloqueo del grip, grabación, joystick, y botón asignable a la derecha; muy parecido al mando de la FS7

Y aquí veis, de arriba a abajo: zoom, bloqueo del grip, grabación, joystick, y botón asignable a la derecha; muy parecido al mando de la FS7

SENSOR SUPER35 MM

¿Qué podemos decir de este sensor? La verdad, nada que no se haya comentado antes.

Sensor Super35 mm Exmor CMOS de la PXW-FS5

Sensor Super35 mm Exmor CMOS de la PXW-FS5

Quizá conviene hacer un poco de historia. Recordaréis, seguramente, una de las cámaras cuyo sensor más me ha gustado: la PMW-F3. Este chip lo compartía con la NEX-FS100, y daba una luminosidad increíble, debido al gran tamaño de píxel. Fue, bajo mi punto de vista, uno de los puntos de inflexión para dar el salto a sensores de Super35 en cámaras de vídeo profesionales relativamente asequibles y modernas.

De hecho, ese sensor trabajaba tan, tan bien, que se pudo utilizar todo lo que se aprendió para aumentar su densidad hasta la ansiada resolución 4K, conservando todos los parámetros, sobre todo el de latitud/sensibilidad. De hecho, en la FS5 estamos trabajando con unos 14 stops. Brutal para una cámara de alrededor de 5000-6000 euros. Y, sí, es el mismo sensor (ojo, no estoy diciendo el procesador) de una F5 o una FS7. Por supuesto, dispone de curvas gamma S-Log2 y S-Log3; si os parece, las explico en el siguiente punto.

Uno de los aspectos más importantes además de la sensibilidad o la resolución es el espacio de color que permite captar el sensor. Y en el caso de la FS5 puede capturar los espacios S-Gamut3 y S-Gamut3.cine.

Y con respecto a por qué un Super35 y no un Full Frame… bueno, es una discusión que podría llevar varios días, pero podríamos dejarlo en que es el sensor con estética de cine por excelencia. Un Full Frame es más difícil de “domesticar”; hay que ser mucho más cuidadoso con el foco, y es una estética menos “natural”. Odio usar tantas comillas, pero no quiero que nadie tome mis palabras como la verdad  absoluta, ni que se sienta ofendido.

Alpha A7s con sensor Full Frame 4K y montura E

Alpha A7s con sensor Full Frame 4K y montura E

Además, como voy a comentar al hablar de la montura, podemos recortar el sensor para quedarnos con un tamaño aproximadamente igual que un Super16 mm. Muy “retro”. 😉

Recorte sobre Super35 4K para obtener Super16 Full HD

Recorte sobre Super35 4K para obtener Super16 Full HD

CURVAS S-LOG

No querría liarme mucho con este aspecto, pero en las sesiones de producto que solemos hacer, se nos comenta a menudo que la gente está encantada con las curvas S-Log. Y, sí, son una enorme ayuda, pero hay que ser cuidadosos con un aspecto que os comentaré más adelante.

En un sensor, el proceso que se realiza básicamente consiste en convertir luz en “salida” (voltaje o ceros y unos). Idealmente, esa relación es lineal: cuando se alcanza el 100% de la luz que el sensor puede capturar, se debería sacar el 100% de valor “electrónico” (esos ceros y unos) en la salida.

Izquierda: curva lineal / Centro: entrega con S-Log / Derecha: linealización de S-Log

Izquierda: curva lineal / Centro: entrega con S-Log / Derecha: linealización de S-Log

Sin embargo, hoy en día se está trabajando, como en el caso de la FS5, con sensores con una latitud (dejémoslo en margen dinámico) enorme. Tanto, que pese a que el sensor no está saturado, la salida se nos muestra sobreexpuesta, por haber llegado al 100% del valor máximo de salida (ojo, lo estoy explicando muy por encima; no quiero meterme en si es o no 100%).

Pues bien, si en lugar de aplicar una curva entrada/salida totalmente lineal, modificamos esa curva (logarítmica) para que las luces altas se puedan capturar, y estén más comprimidas, y luego aplicamos una curva (antilogarítmica) que al multiplicar a la otra nos dé una curva lineal, habremos podido utilizar todo el rango del sensor (por ejemplo, hasta un 800% o un 1300%), sin haber perdido las altas luces, “metiéndolas” en la parte alta de ese 100% de rango de salida. Al final de la cadena, como es obvio, la señal queda linealizada, pero con un rango muchísimo mayor.

(En concepto, es muy parecido a un preamplificador RIAA para audio: un plato giradiscos no nos da una salida lineal, porque necesitaría unos surcos enormes para poder tener grabado mecánicamente todo el margen dinámico de la música. Se aplica una curva que se corrige en la etapa RIAA o preamplificador Phono.)

¿Y para qué resulta útil una curva de gamma logarítmica? La mayoría nos habremos encontrado en algún momento en la situación en la que una zona de la imagen aparece sobreexpuesta, y simplemente renunciamos a ella, o a la zona de bajas luces, porque no podemos albergar todo con nuestra cámara: un interior con una ventana por la que entra luz, las nubes… Y simplemente dejábamos esa ventana o las nubes totalmente sobreexpuestas. Pues ahora podemos recuperar toda esa información que teníamos a través de la ventana, o tener todos los matices grisáceos en las nubes. Conceptualmente, es ese término que está tan de moda en vídeo: HDR (High Dynamic Range).

Típica situación en la que un videógrafo sufre en una boda (aún más). Imagen sin retocar tomada con Xperia Z1

Típica situación en la que un videógrafo sufre en una boda (aún más). Imagen sin retocar tomada con Xperia Z1

Ah, y ¿qué hay de esa precaución de que os hablaba? Al aplicar una curva (pongamos una S-Log3), aplicamos un mínimo de ganancia (en la FS5, 3200 ISO). Esto implica que en altas luces, sí, vamos a poder recuperar toda la información, pero en bajas luces vamos a estar aplicando una ganancia mínima en todo caso. Si se trata de una escena con ruido, al aplicarle ganancia lo estamos levantando, y por eso en bajas luces con la S-Log a veces nos aparecen zonas más ruidosas de lo habitual. Por eso recomiendo usar las curvas S-Log sólo cuando sean realmente necesarias, no siempre (lo cual resulta muy cómodo, porque “ahí lo tengo, y ya lo recuperaré”, pero puede ofrecer más ruido).

FILTRO ND ELECTRÓNICO VARIABLE

Tras este nombre tan largo y raro, se esconde un invento realmente útil.

Si echamos la vista atrás, recordaremos que la FS100 no tenía filtros de densidad neutra, porque la distancia entre sensor y montura los hacía muy difíciles –y caros- de implementar en aquellas fechas. De hecho, ese fue uno de los mayores avances cuando se lanzó la FS700: Sony pudo desarrollar unos filtros ND lo suficientemente estrechos para que cupiesen en ese espacio tan limitado.

Por otra parte, en los modelos de mano PXW-X180 y PXW-X160 se incorporó un nuevo tipo de filtro, que, aparte de disponer del clásico filtro “a saltos” (1/4, 1/16…),  permitía modificar la transmitividad del filtro de una manera mucho menos escalonada, con un comportamiento más “analógico”, puesto que tenemos hasta 128 pasos de filtro, ajustables mediante una rueda.

Pues bien, en la FS5 tenemos por primera vez en nuestro sensor 4K Super35 mm ese filtro electrónico variable de densidad neutra. O filtro de densidad neutra electrónico variable. Bueno, ordenadlo como queráis.

El filtro electrónico variable de densidad neutra, y la rueda de filtros clásicos

El filtro electrónico variable de densidad neutra, y la rueda de filtros clásicos

¿Y para qué sirve? Imaginad la típica situación en la que estamos grabando un interior con el iris abierto (y con una bonita profundidad de campo) y de repente cambia la iluminación (salimos al exterior, alguien abre una ventana, pasamos a otra estancia…). ¿Qué nos pide el cuerpo en primera instancia? Lo más inmediato podría ser cerrar iris para que entre menos luz, y así evitar sobreexponer, pero entonces nuestra profundidad de campo pasa a ser mucho mayor y la estética cambia, es «más de vídeo». Entonces, para quedarnos con la misma PdC, pongámosle «gafas de sol» a la cámara (los filtros de densidad neutra). Pero sólo tendríamos 3 saltos, si son filtros discretos (por cierto: en este caso, no tienen por qué tener unos valores fijos de fábrica). Lo primero: veremos el salto en la grabación. Lo segundo: seguramente no bloquearemos exactamente la cantidad de luz que queremos, así que al final tendremos que modificar algo el iris, o incluso tocar ganancia, o modificar obturación. Mejor tener unos filtros con un comportamiento casi analógico, con transición suave en cada paso. Y así, llegaremos a un punto en el cual la luz que llega al sensor sea aproximadamente la misma que teníamos en interior, manteniendo nuestra apertura de iris y respetando la profundidad de campo.

LA MONTURA E

La montura, como ya he comentado, es la que ya existe desde hace años en Sony: la montura “E”, que permite el uso de prácticamente cualquier sistema de lentes, que tiene interfaz de comunicación con la lente –para aquellas que se puedan controlar desde la cámara-, y que puede albergar sensores Full Frame (series A7), APS-C (en la NEX-EA50M), y Super35 (como en este caso, en el de la FS7, FS700 o FS100). No sólo hay una gran oferta de lentes con montura E y A (en ese caso, necesitaríamos un adaptador LA-EA de Sony), sino que si utilizamos adaptadores para otros sistemas, las combinaciones son prácticamente infinitas.

En montura E y A de Sony, la oferta es bastante extensa; con adaptadores, casi infinita

En montura E y A de Sony, la oferta es bastante extensa; con adaptadores, casi infinita

Así, si venimos de lentes EF, únicamente tendremos que tener en cuenta un factor de corrección de aproximadamente 1.6 con lentes Full Frame (las lentes serán más “tele”: un 80 se convierte en un 128, así que ojo a los angulares), que incluso podemos corregir y obtener 1-1.5 stops más mediante adaptadores activos (con lente en su interior).

Lente Full Frame en sensor Super35 con adaptador activo

Lente Full Frame en sensor Super35 con adaptador activo

En el caso contrario, podemos encontrarnos el problema del “viñeteo”: si utilizamos lentes muy estrechas, no logramos cubrir de luz todo el sensor. Pero en el caso de la PXW-FS5, desde el principio tenemos la opción de “escaneo central” del sensor: como es un sensor Super35 con resolución 4K, podremos usar sólo la parte central del sensor para tener el equivalente a un SUPER16 mm, con todo lo que eso conlleva (estética, lentes de Super16, menor efectos por rolling shutter porque hay menos cantidad de información a extraer, etc).

Viñeteo de lente S16 sobre sensor en S35; al recortar, se ajustan las superficies

Viñeteo de lente S16 sobre sensor en S35; al recortar, se ajustan las superficies

Personalmente, la montura E me parece de los mejores inventos que se han incorporado últimamente en el mercado profesional de vídeo desde el mercado de la fotografía.

Frontal de la FS5

Frontal de la FS5

CÁMARA SUPERLENTA

Una de las funciones que más gustaban de la FS700 es la superlenta. Pues bien, aquí se ha integrado directamente con las mismas prestaciones. Con respecto a la FS7 tiene una ventaja y un inconveniente.

La ventaja: alcanzamos hasta 240 fps con un escaneo en Full HD del sensor (a mayores velocidades -llegamos hasta 960 fps-, se leen menos líneas y se interpola la señal hasta inflarla a 1080).

El inconveniente: como trabajamos sobre un buffer circular, tenemos un número máximo de cuadros que se pueden almacenar. Esto implica que, por ejemplo, si grabamos a 24p y ajustamos la superlenta a 240, disponemos de unos 8 segundos de tiempo real en el buffer. Como estamos grabando a una velocidad 10x, esos 8 segundos se convertirían en una grabación en superlenta de 80 segundos, ya pasado en codec a 24p.

Y para solventarlo, no sólo podemos disparar la superlenta desde el momento en el que pulsamos el botón de grabación, sino que hay otros dos modos: END TRIGGER y HALF TRIGGER. Si queréis ver cómo funciona el “end trigger”, podéis echar un vistazo a este vídeo, en el que lo demuestro sobre una FS700: https://www.youtube.com/watch?v=QAPEXnVptUU

Básicamente, ese modo “end trigger” nos permite… bueno… suena raro, pero… “grabar el pasado”: como estamos trabajando sobre ese buffer circular, tenemos esos 8 segundos grabándose continuamente. Al pulsar el botón REC, simplemente descargamos lo que ya se había almacenado desde hace 8 segundos: en lugar de estar con nuestro dedo sobre el botón, pendientes de “lo que va a ocurrir” (golpeo de un balón, un salto al agua…), esperamos a que ocurra, y pulsamos el botón. Sencillo e inteligente.

Ah, y un pequeño comentario: si, como en el ejemplo que os comentaba de 240 fps a 24p, disparamos a 10x, estaríamos “obturando” a un décimo de la velocidad original, así que al sensor nos llegaría un décimo de la luz original. Por eso, la imagen se nos oscurece, y si aplicamos ganancia (unos 9-10dB para igualar, más o menos), el ruido se nos puede levantar, y, lógicamente, la imagen puede ser más ruidosa que sin la superlenta. Tenedlo en cuenta también por si necesitáis otro tipo de iluminación. 😉

CONEXIÓN INALÁMBRICA… Y “ALÁMBRICA”

Hasta ahora, no era raro encontrar conexiones por NFC y WiFi en cámaras de Sony: el NFC (Near Field Connection o Near Field Communication, nunca me acuerdo; comunicación de campo cercano) permite que al acercar un dispositivo como un teléfono inteligente o una tableta, se “salude” con la cámara y comiencen un protocolo de comunicación que será finalmente WiFi. El NFC diríamos que hace un “handshake”, un “apretón de manos” mediante el cual ambos dispositivos se ponen de acuerdo en qué lenguaje utilizar (WiFi). Así podremos controlar remotamente la cámara y monitorizar (principalmente encuadres; obviamente, hay retardo y la calidad no es óptima) la señal. Para ello, necesitamos la aplicación correspondiente (Content Browser Mobile); si mal no recuerdo, si aún no la tenemos instalada en nuestro dispositivo, este protocolo nos lleva a Google Play o a la tienda de Apple para descargarlo sin tener que buscarlo. Aquí os lo dejo, para ahorraros investigarlo:

https://play.google.com/store/apps/details?id=com.sony.promobile.ctbm.main

https://itunes.apple.com/es/app/content-browser-mobile/id792603561?mt=8

La conexión WiFi también permite hacer streaming directo desde cámara (sin QoS o control de calidad). Perfecto para integrar ese streaming en una web, o para enviarlo a través de una red corporativa.

Pero a casi todos nos ha ocurrido alguna vez lo siguiente: haces tus pruebas en casa, en tu empresa, lo dejas todo configurado, funcionando… pero cuando llegas al evento, hay millones de redes ocupando el espectro, o algún inhibidor de frecuencias, o el forjado del edificio hace de jaula de Faraday… Se nos presenta amistosamente todo tipo de obstáculos. Y ahí preferiríamos tener a mano una conexión mediante cable. Pues bien, la FS5 dispone de esa conexión para hacer el streaming.

Conectores BNC (SDI), HDMI, RJ45 y entrada 2 de XLR

Conectores BNC (SDI), HDMI, RJ45 y entrada XLR

Me parece perfecto, sobre todo para grabaciones de eventos en las que se puede tener el entorno controlado y puedo cablear a mi gusto. O con cámara fija, entendiendo por tal desde la que está en un trípode hasta la que hemos instalado en una grúa.

ZAPATA INTELIGENTE

Desde hace varios modelos, Sony ofrece no sólo las zapatas “clásicas” (zapatas frías para accesorios), sino una zapata inteligente, denominada comercialmente “MI Shoe” (Multi-Interface Shoe) que ofrece comunicación a través de la propia zapata entre la cámara y el accesorio compatible que se conecte..

Vista superior de la cámara: zapata inteligente (y fijaos dónde se puede poner el visor)

Vista superior de la cámara: zapata inteligente (y fijaos en dónde se puede poner el visor)

Así, podemos conectarle una cajita de doble XLR (XLR-K2M), una antorcha que podemos gobernar desde la FS5 (HVL-LBPC) o, lo que me parece más interesante, un receptor de microfonía inalámbrica de la serie UWP-D, que mediante el accesorio de adaptación SMAD-P3 permite que la señal se inserte directamente en la cámara sin necesidad de que ningún cable quede en el exterior.

Receptor UWP-D conectado a PXW-FS5 mediante SMAD-P3

Receptor UWP-D conectado a PXW-FS5 mediante SMAD-P3

Antorcha LED HVL-LBPC conectada a PXW-FS5 directamente

Antorcha LED HVL-LBPC conectada a PXW-FS5 directamente

CLEAR IMAGE ZOOM

Esta tecnología permite sustituir el clásico zoom digital (del que seguimos pudiendo disponer) por un algoritmo mucho más evolucionado.

En un zoom digital, si tenemos que interpolar un punto entre dos existentes, básicamente se calcula la media aritmética: entre un valor de 1 y un valor de 5, se determina que en el medio sea un 3. Sencillo, pero no siempre da la mayor calidad.

Sin embargo, en Sony hemos aplicado nuestra gran experiencia con señales de vídeo. Esto nos ha permitido que, debido a la resolución del sensor, podamos analizar múltiples puntos de la señal y compararla con una biblioteca de patrones de imágenes previamente parametrizadas. Por ejemplo, que cuando hagamos zoom, la mayor parte de la información se desplace radialmente hacia fuera. O que cuando hacemos una panorámica lo haga hacia un lado. O que si hay zonas oscuras granuladas rodeadas de otras verdes podamos interpretar que es un “árbol”. Así, esos comportamientos o patrones permiten predecir e interpolar de manera mucho más precisa. Y mediante el resultado de este algoritmo por un lado, más el del zoom digital clásico por otro, se ofrecen una precisión y una calidad de imagen mucho mayores a la hora de hacer zoom.

Si queréis echarle un vistazo, en este vídeo lo explico con una X70: https://www.youtube.com/watch?v=2PhqoQxaoew (de nuevo, disculpad por la calidad del vídeo; uno hace lo que puede en el tiempo que puede L ).

CÓDEC

Esta suele ser siempre la parte más árida para explicar, puesto que poco más hay que añadir a los datos de que se dispone en los catálogos o la web.

En Full HD tenemos códecs AVCHD hasta 28 Mbps (50p), como en la FS700, y además XAVC Long GOP hasta 50 Mbps (hasta 50p, 4:2:2 con 10 bits de profundidad).

En 4K, sigue siendo XAVC Long GOP, en dos velocidades: 60 y 100 Mbps (en ambos casos a 25p, 23.98p o los queridísimos 23.98p).

Por supuesto, si alguien prefiere trabajar con otro códec, ahí están las salidas SDI y HDMI para grabadores externos (hoy en día muy habitual, especialmente para quien ya tiene optimizado su flujo de trabajo, aunque recomiendo probar el XAVC si aún no lo habéis hecho 😉 ).

En XAVC Long GOP QFHD a 100 Mbps, una tarjeta SD de 64 GB nos ofrece aproximadamente 65 minutos de grabación. En Full HD a 50 Mbps serían unos 120 minutos en la misma tarjeta. Y con AVCHD a 28 Mbps, alcanzaríamos unos 290 minutos.

Y con respecto a la pregunta de qué pasa con el RAW: sí, será capaz de grabar RAW externamente en el futuro, pero no sabemos (ni podríamos decir) cuándo ni cómo a día de hoy.

GRABACIÓN INDEPENDIENTE

Aún no lo había comentado, pero en la FS5 podemos grabar sobre tarjetas MS o SD en la ranura A, y únicamente sobre SD en la ranura B. Vamos, que tenemos dos ranuras, a diferencia de la FS700. Por otra parte, tenemos tres botones de grabación: uno en el grip, uno en el asa de la cámara y el tercero en el cuerpo de la cámara.

Pues… os lo podéis imaginar: no sólo tenemos el clásico modo de grabación continua (si se acaba la tarjeta A, que siga en la B automáticamente y sin perder ningún cuadro), y el de grabación simultánea (ambas tarjetas grabando lo mismo; por ejemplo, como copia de seguridad, o para enviar una a edición y otra a retoque de color), sino que además podemos grabar independientemente en ambas tarjetas, controlando cada una desde un botón de grabación distinto. Resulta especialmente útil en eventos como conciertos, bodas, acontecimientos deportivos, conferencias, «videoblogueros»… en los cuales viene bien tener en una tarjeta todo el evento en una o unas pocas tomas (para no perdernos nada, y para sincronizar en el sistema de edición si falla el código de tiempos), y en la otra cada una de las partes en un clip (cada canción, cada etapa, cada conferenciante, cada intento…).

Grabaciones simultánea, continua e independiente

Grabaciones simultánea, continua e independiente

AUDIO

Por supuesto, las entradas de audio son XLR profesionales, pero a diferencia de la X70 o la NX3, están físicamente separadas entre sí (esto ya lo vimos en la FS700, pero en ese caso estabn ambas en el cuerpo de cámara): una en el asa, y otra en la parte trasera.

La grabación es de 2 canales; si grabamos en AVCHD, podemos elegir entre Dolby Digital o la aún mejor PCM lineal, en ambos casos a 48 kHz y con 16 bits de profundidad.

Si usamos el códec XAVC, el audio se graba en PCM lineal a la misma frecuencia, pero en este caso la profundidad es de unos asombrosos 24 bits.

BATERÍAS

Si ya habéis utilizado alguno de los modelos de mano o de semihombro de Sony (EX1, EX1R, EX3, 200, X200, 150…), podréis reutilizar sus baterías, puesto que la FS5 utiliza las BP-U30, BP-U60, BP-U60T o BP-U90.El cargador es el BC-U1 o el BC-U2.

CONCLUSIÓN

No soy quizá la persona adecuada para emitir un veredicto sobre la PXW-FS5, no sólo por ser parte interesada, sino porque no tengo la suerte de ser un usuario real; sólo lo soy ocasional, y mucho menos frecuente de lo que me gustaría.

Sin embargo, hay varios aspectos que veo relativamente claros:

  • La ergonomía que tiene la FS5 es difícilmente igualable por ninguna cámara existente hoy en día; ni siquiera la FS7, debido simplemente al tamaño y al peso
Así de pequeña queda sin accesorios; perfecta para drones, carcasas, POV...

Así de pequeña queda sin accesorios; perfecta para drones, carcasas, POV…

  • El sensor es, sencillamente, brutal. Permite jugar con curvas S-Log, ofrece un espacio de color enorme, podemos reducirlo a Super16, los efectos por rolling shutter están minimizados…
  • La posibilidad de grabar en cámara lenta hasta 240 fps  en Full HD es algo que funcionó genial en la FS700, y ahora lo tenemos exactamente igual aquí.
  • Poder mantener la profundidad de campo (que, seamos sinceros, es una de las cosas que más nos gusta hoy en día) con el filtro ND electrónico variable está muy bien pensado para no quedarnos expuestos (bueno, sobreexpuestos) en exteriores 😉
  • Que podamos usar cualquier lente, sin necesidad de renovar toda la colección, simplemente usando adaptadores, hace que usar esta cámara no sea en absoluto caro (igual que el hecho de usar tarjetas SD).

Y prestaciones como que el streaming o el envío de ficheros puedan ser cableado, que podamos priorizar una cara detectada con la cámara y le haga un seguimiento de foco, el magnificador para ayudar al foco, la interfaz inteligente, grabación de proxy, las dos tarjetas con grabación independiente, los códecs que incorpora, el ventilador silencioso de baja velocidad, que podamos comprar el kit de sólo el cuerpo o también la lente… son algunas  características que hacen de la FS5 una cámara muy interesante y que creo –y deseo- que pegará muy fuerte. 🙂

Un atento saludo a todos, y muchísimas gracias. Ah, y disculpad por la extensión del artículo, pero creo que la ocasión lo merecía.

Añadido el 12 de septiembre, para aclarar lo siguiente:
Salidas
SDI (sólo HD): 422 10 bit
HDMI (4K/HD): 422 8 bit

Grabación
AVCHD (HD): 420 a 8 bits, 28Mbps
XAVC-L (HD): 422 a 10 bits, 50Mbps
XAVC-L (4K): 420 a 8 bits, 100Mbps

ISO con SLog: 3200
ISO sin SLog: 1000

Alvaro Ortiz

Product Specialist / Content Creation

Twitter: @AlvaroOrtizSanz

YouTube: Alvaro Ort

Sony PXW-FS5 Overview

Hi there!

First of all, probably you’d like to take a look on this unboxing video: https://youtu.be/KxscV0Fcu4A and, even better, on this other one that basically explain the same as I try to consider in this blog entry: https://youtu.be/fv3vt62VP7s

As you may know, a few minutes ago, new PXW-FS5 camcorder was announced, after one week of teasers with #NoLimits and #MissingPiece hashtags.

PXW-FS5

PXW-FS5K

Despite it was just one week of rumours and shaking, and even more job done during last months (what a great team I belong to!), everything is finally disclosed now.

So, let’s talk about what was announced…

Many of you may have worked, or at least probably know the two models I’m going to especially refer to when talking about PXW-FS5: PXW-FS7 and NEX-FS700 (other models will show up eventually).

I use to comment that, from my point of view, those two camcorders belong to different generations: FS700 (like FS100) could be basically defined as “a box with a nice sensor”. Obviously, it’s much more than that, but related to ergonomics, that’s the first generation: priority was sensor quality, lens compatibility and camera features. But ergonomically, certain accessories were commonly needed in order to work in a traditional way, to hold the camera comfortably. And, as an example, LCD position was not totally proper for high takes (in some cases, users shot with the FS700 upside down, in order to monitor signal; image inversion was done in post).

However, evolution into bigger sensor cameras, with great features, but also with an optimized ergonomics kicked off with F-series (F5 and F55), and its modular body: they could be shoulder mounted, and any kind of accessory could be easily attached (follow focus, mattebox, steady…)

The one that probably meant a real revolution in this market, when referring to ergonomics, was PXW-FS7: it simply inherited the best from both worlds. On the one hand, it’s compact, agile (“run and gun”), with an easy operation both from “ascending” users from a FS700, like for “descending” people from an F55, and even for those ones that finally decided to replace their fancy EX3, EX1, 200… and on the other hand, it still keeps those stunning features we saw in F5, with a more “friendly” lens mount, with easier-to-find adaptors: the widely-known E-mount. Moreover; those lens that are typically used over E-mount (practically, ANY lens, since the flange back distance –sensor to mount end- is really short: just 18 mm), as they use to be light, which perfectly matches FS7.

No need to say FS7 was the desired gem for many users: flexible, powerful, carefully designed, robust… and even budget saving. But even at its –relatively- low price, some users prefer to keep working with, let’s say, “older” tools or workflows, either due to concept or even age, such as DSLRs, and they consider that working with a still camera that shoots video is “enough because it’s cheap”. They may be right, but we must also consider that camera body plus those accessories needed to make it a “fully working” video camera raises their budget even to the point to equal FS7’s price. So, that sentence saying “for the price of a FS7, two DSLRs can be bought” is not completely true.

So, ok, let’s assume that for some users, FS7’s price may still be a bit high. Or that a second camera could be a nice help for our production, but we cannot double budget. Or that there are certain situation in which FS7 may be “too much” (too bulky, too big…). For instance, an FS7 is obviously a multi-purpose camcorder, but when shooting a wedding, it’s worth having something even more agile. Or new producers for online media (YouTubers, Vimeo creators…): it’s not just a matter of placing a camera in front of them, but also to have a cinematographic look, with a shallow depth of field, yet not expensive. Or even a drone: putting an FS7 at risk is… too risky, and something lighter would be safer.

For all those situations in which an FS7 is not “reachable”, due to any reason, or in which something smaller would fit better, are the ones FS5 has been designed for.

ERGONOMICS

Camera body, with no accessory attached, weighs only 0,8kg (core is magnesium built), and is totally modular. That’s why I was telling it wouldn’t be weird to se FS5 mounted in drones, small cranes, underwater housings… because size is also really compact, especially in comparison with the already not big FS7:

Comparación de tamaño entre una PXW-FS5K y una PXW-FS7K

Size comparison between PXW-FS5K and PXW-FS7K

As in FS7, both screen and grip are detachable, so the camera can work without them fixed. This involves that in really tight environments (cars, lifts, closets, fridges…), we can shoot with the camera body and the controls (grip and LCD) only linked through a couple of cables, but not mechanically attached. So, camera can be lying in our legs or in some support while we operate from one side.

La FS5 es modular. MUY modular

As you can see, FS5 is modular. VERY modular

Moreover, even if FS7’s arm can be adapted (some spare parts are needed), grip is directly mounted over the camera body, and FS5’s center of gravity is in a very low position, slightly moved to the right, so it’s unlikely to “tilt” as if we had the arm more spaced from the body (it depends, logically, on the lens we use). Also, in high takes in which camera needs to be on an upper position (at very crowded events, like concerts, weddings, etc), our forearm will be less stressed than with classical handy camcorders.

No need to say that FS5’s grip allows menu navigation, and also blocking and unblocking its vertical angle, to set it in the correct position at every moment, so the camera can be fully operated just with the right hand, leaving your left hand to operate the lens (basically, focus, since if it’s a motorized lens, we can have zoom on the zoom lever, an iris/shutter on the grip dial).

Aquí podéis ver el control de zoom y el potenciómetro/dial asignable (típicamente, para iris)

FS5’s grip with zoom control and assignable dial (typicall for iris, but can be assigned to gain, electronic variable ND filter…)

Y aquí veis, de arriba a abajo: zoom, bloqueo del grip, grabación, joystick, y botón asignable a la derecha; muy parecido al mando de la FS7

And here you can see zoom lever, grip block slider, REC button, joystick and assignable button #5 (I like that to be assigned to MENU)

SUPER35 MM SENSOR

What can be told about this sensor? To be honest, nothing that hasn’t be told before.

Maybe it’s worth reviewing a little of Sony’s recent history. You may remember one of the cameras that I personally was amazed about the sensor: PMW-F3. This imager was shared with NEX-FS100, and was incredibly sensitive. From my point of view, it was one of the milestones to jump into Super35 mm sensors in relatively “cheap” professional camcorders.

In fact, its behaviour was so, so good, that everything learned on it could be inherited in the well-desired 4K resolution sensors, keeping all the parameters, especially latitude/sensitivity. To illustrate it, FS5 works with about 14 stops. Simply amazing for an approx. 5k€ camcorder. And, yes, it’s the same sensor of that of a FS7 or F5 (be careful: I’m not talking about the processor – just the imager). Of course, FS5 allows to use S-Log2 and S-Log3 gamma curves; let me talk about that in the next section, apart from this one.

Sensor Super35 mm Exmor CMOS de la PXW-FS5

PXW-FS5’s Super35 mm Exmor CMOS sensor

One of the most important features, asides from sensitivity or resolution, is the colour space that the imager is capable to capture. And when talking about FS5, it’s S-Gamut3 and S-Gamut3.cine.

And you may wonder why Super35 mm and not Full Frame size. Well, it’s a long-time discussion that might take several days, but let’s stick to: it’s the reference cinema sensor size. A Full Frame sensor is harder to “domesticate”; a much more careful (sometimes sick) job needs to be done over focus, and its aesthetics, yet “oniric”, may not seem totally natural. Sorry for being so subjective, but I wouldn’t like to offend anybody; I obviously don’t have the absolute truth on this.

Moreover, as I’ll tell when talking about the lens mount, we can “trim” sensor so that we can work with a size that is very similar to Super16 mm. Really “vintage”. J

S-LOG CURVES (just a technicalish approach)

I wouldn’t like to spend a lot of words on this (there are much more skilled people out there), but in our product sessions, we detect a lot of people that are really keen on S-Log gamma curves. And, of course, they are a great help, but we need to be careful with an aspect I’ll tell you later.

In a sensor, what is basically done is to convert light (input) into “output” (voltage, binary values…). Ideally, that transfer is linear: when 100% light that sensor is capable to acquire is reached, 100% of the output electronic value should be provided (those binary values, or voltage level).

S-Log explanation

Left: linear transfer / Centre: S-Log curve / Right: S-Log linearization

However, nowadays we are working (as in FS5) with sensors with a huge latitude (let’s say dynamic range). So big  that, even if sensor is not saturated yet, output is shown as overexposed, because it has reached its 100% maximum value (this is just a basic explanation; I wouldn’t like to jump into a conversation about if it should not be 100%).

If instead of applying a totally linear input/output transfer, we modify that curve (to logarithmic), so that highlights can be captured, and they are compressed, and later we apply an opposite curve (antilogarithmic/exponential) that, when multiplied by the other curve, results in a linear result, we could have got more dynamic range from the sensor (800%, 1300%, instead of the original 100%), without losing highlights, fitting all that range in that 100% output maximum level. Finally, as you can imagine, signal is linearized, with a much bigger range.

(Conceptually, it’s very similar to a RIAA preamplifier in audio: a turntable doesn’t provide a linear signal –“line”-, because it would need huge grooves to have all dynamic range recorded in its surface. A curve is applied that is corrected in the RIAA preamp or Phono preamp).

So, what is logarithmic gamma curve useful for? Most of us may have found situation in which a part of the image is overexposed, and we have simply accepted to lose that signal, or the low light signal, because we cannot host both levels in our camera: an indoor take with a window which light is passing through, clouds… and we simply kept that window overexposed, or clouds totally white. Now, we can recover all that info that was there, through the window on or all those grey levels in the cloud surfaces. In concept, it’s similar to that term that is becoming so fashionable in video world: HDR (High Dynamic Range).

Oh, and what is that warning I was talking about? When applying a curve (let’s say S-Log3), a minimum gain is applied (ISO3200 in FS5). This means that, in highlights, we’re going to be able to recover all that info, but in low lights, a default gain is used. If our sensor is not immune to noise enough, or it’s simply a noisy scene, when applying gain noise is also raised, and that’s why in low lights with S-Log sometimes some noisy areas appear. That’s why I recommend not using S-Log gamma curves for everything, but only if necessary; many people find it useful to use them always, as “info is there and I’ll recover later, no need to worry about overexposure”.

ELECTRONIC VARIABLE ND FILTER

Behind this long and strange name, a really useful brainchild is hidden.

If we look back, we can remember that FS100 didn’t have internal neutral density filters, since distance between sensor and lens mount made them really difficult –and expensive- to be implemented by those dates. In fact, that was one of the biggest improvements when FS700 was released: Sony could finally develop ND filters thin enough to fit in such a tight space.

In the late times, we could find a special type of filter on PXW-X180 and PXW-X160 camcorders, that apart from the “classical” step-by-step filter (1/4, 1/16…), had another kind that allowed light transmission to be modified in a much smoother way, with a more “analogic” behaviour, because up to 128 filter steps can be adjusted through a dial.

Well, now in FS5 we have, for the first time over our 4K Super35 mm sensor, that electronic variable ND filter.

El filtro electrónico variable de densidad neutra, y la rueda de filtros clásicos

Electronic variable ND filter and classical discrete filter selector

Answer to “what is it useful for?”: Imagine (well, remember) that situation in which you were shooting indoors with your camera iris fully open, with a gorgeous DoF, and suddenly something changes in lighting (we may go outdoor, some window may be opened, we get into another room…); what’s the first reaction? We need to reduce light in our sensor, so we would probably close iris to prevent it from overexposure, but then our beloved shallow DoF becomes much larger. Then, let’s put some “sunglasses” on our camera –ND filters, actually. But we usually have only 3 steps, if they are discrete filters. Immediate effect #1: we will notice some sudden decrease of light in our footage. Effect #2: probably we won’t be blocking the exact quantity of light we really want to be blocked, so we may eventually need to modify any parameter like iris, or even adjust gain, or modify shutter. So, it’s clearly better to have ND filters with an “analogic” behaviour, with a smooth transition between steps. And, that way, we will reach a threshold in which light lying in the sensor will be approximately the same as we had indoor, preserving depth of field.

Típica situación en la que un videógrafo sufre en una boda (aún más). Imagen sin retocar tomada con Xperia Z1

Typical situation in which a wedding videographer suffers (even more) during a wedding. Unedited image captured with a Xperia Z1

E-MOUNT

As written above, FS5’s mount is the already existing Sony “E mount”, that allows almost any lens to be installed, that has an internal interface to talk to the lens –for those that allow that- and that can host up to three kind of sensors: Full Frame (A7 and VG series), APS-C (NEX-EA50M) and Super35 mm (PXW-FS5, PXW-FS7, NEX-FS700, NEX-FS100). There is not only a huge range of E and A mount lenses (Sony LA-EA adaptor would be needed) available, but also an almost infinite combinations with third party lenses and adaptors.

En montura E y A de Sony, la oferta es bastante extensa; con adaptadores, casi infinita

Sony’s E and A mount lenses offer is huge; with adaptors, almost infinite

So, if we are already EF lenses users, we would only need to bear in mind a crop factor that is close to 1.6 with Full Frame lenses (each lens will be more “tele”: an 80 mm will become a 128, so you need to be careful especially on the wide angle side), that we can even reduce to obtain 1-1.5 more stops through active adaptors (with a lens inside them).

In the opposite case, we could face that problem named “vignetting”: if we use very narrow lenses, we cannot cover the sensor totally. But in FS5’s case, from the release date there is a function to avoid that: “central scanning” in the sensor. Since it’s a Super35 4K-resolution sensor, we can just crop or use its central part, with 1/4 of the original surface (half height, half width) to have a sub-sensor equivalent to a Super16 mm, with all the consequences it involves (aesthetics, Super16 lenses, less rolling shutter derivative effects since there is less area and number of pixels to output…).

Personally, I think that E-mount is one of the best inventions that have been incorporated to the professional video market from the photo world in the last years.

Flange back distance, between sensor and top of the mount

Distance between sensor and top of the mount

SUPER SLOW MOTION (HIGH FRAMERATE)

One of the most loved FS700’s feature was its Super SloMo. Now, that feature has directly been integrated in FS5, with the very same high performance. It has one advantage and one disadvantage when compared to FS7.

The advantage is reaching up to 240 fps with a Full HD scan in the sensor (at higher framerates, less lines are scanned and signal is interpolated to “inflate” into 1080).

The disadvantage: as the camera works over a buffer, there is a maximum quantity of frames that can be stored. This means that, for instance, if we’re using a 24p codec and we use the 240 fps Super SloMo, we have just about 8 seconds real-time due to the buffer. As we are shooting at 10x faster speed, those 8 seconds would become a Super SloMo take that lasts around 80 seconds. So, for solving that issue with a time limitation in the buffer, we can not only shoot in a classical “Start-Stop” way (“Start Trigger”), but there are also two buffer-based modes: “End Trigger” and “Half Trigger”. If you wish to see how “End Trigger” mode works, you can take a look on this video, in which I demonstrate it with a FS700:

https://www.youtube.com/watch?v=KOF87sdIQUk

To sum up, that “End Trigger” mode allows us to… well… it may sound weird, but… we can “record the past”: as we are using a rolling buffer, there are at any time the last 8 seconds being stored on it. When we press the REC button, that buffer simply starts to download its recorded material since 8 seconds ago: this allows us to avoid being with our finger in the trigger waiting for something to happen (a football kick, a jump into the water…), but we simply wait for it to happen, and then we press the button. Simple and smart.

Oh, and let me drop you a little comment/advice: in the previous example (240 fps at 24p), we would be shooting at 10x, so we would be shuttering 10x faster, so sensor would collect just 1/10 original light. Thus, image is darker in SloMo, and if gain is applied (let’s say 9-10 dB to compensate, more or less), then noise is raised, and, logically, image can be more noisy than without Super SloMo. Please bear that in mind, because you may need a more careful illumination in your scene. 😉

WIRELESS AND WIRED CONNECTIONS

So far, it was not weird finding Sony cameras with NFC and WiFi: NFC (Near Field Connection/Communication) allows that, when a smartphone or tablet is brought near the camera, they “say hello” and a communication protocol starts, that will eventually be via WiFi. We could say that NFC would just setup a “handshake” between both devices, and they agree which “language” to use (WiFi).

This way, we can remotely operate our camcorder, and view (mainly just framing; obviously, some slight delay is experienced, and picture quality is just “enough”) from the appropriate application –Content Browser Mobile. As far as I remember, if it has not yet been installed in our devices, the process leads us to Google Play or Apple Store to download it without the need to search for it.

WiFi connection in FS5 also allows streaming directly from camera (no QoS), which is perfect for integrating such streaming inside a website or for sharing it within a LAN.

But everybody will have experience that situation in which tests have been done at home or at job, leaving everything configured and working fine… but when on field, there are hundreds of networks saturating the spectrum, or any frequency inhibitor, or some building wrought that seems to be a Faraday cage. Any inconvenience may be found, and that’s when we would rather have a wired connection. As you can see, FS5 allows that wired connection for streaming:

[ETHERNET CONNECTOR]

Conectores BNC (SDI), HDMI, RJ45 y entrada 2 de XLR

Rear connectores: BNC (SDI), HDMI, RJ45 and XLR rear input

MULTI-INTERFACE SHOE

Since some models ago, Sony not only offers the classical “cold” shoes for accessories, but also an intelligent shoe, called “MI Shoe” (Multi-Interface Shoe) that allows communication between camera and connected compatible accessory to be established.

That way, we can connect an XLR box (XLR-K2M), a torch that can be commanded from FS5 (HVL-LBPC) or, which could be even more interesting, a wireless digital microphone receptor belonging to UWP-D series, that can insert audio inside the camera directly, with no external cable, via an accessory named SMAD-P3.

Receptor UWP-D conectado a PXW-FS5 mediante SMAD-P3

UWP-D digital wireless receptor attached to PXW-FS5 via SMAD-P3

Antorcha LED HVL-LBPC conectada a PXW-FS5 directamente

HVL-LBPC LED torch  directly attached to PXW-FS5

CLEAR IMAGE ZOOM

This technology can replace classical digital zoom (that is still also available) by a more evolved algorithm.

In a purely digital zoom, the way to interpolate is by an average calculation: if a value between a “1” and a “5” needs to be invented, let it be just “3”. Easy, but not optimal in many situations.

However, in Sony we realized that we have kinda “experience” in video world. This allowed us to use multiple analysis points due to the sensor resolution, and, according to them, find their parameters and compare to some classified image patters previously stored. For instance, when zooming in, most of the info is radially moving to the frame edges. Or, when panning, most of that info is moving horizontally. Or we can even classify some dark granulated areas surrounded by green as “a tree”. So, those behaviour patterns allow us to predict and interpolate much more accurately. And this algorithm in a branch, plus the classical digital zoom on the other path, provides a high accuracy and a way better picture quality when using zoom.

If interested, you can take a look on this video in which that technology is explained on a X70:

https://www.youtube.com/watch?v=fBJYWchFBtg (again, sorry for the video quality: it’s the best I could do at that moment L ).

CODEC

This uses to be the most boring part to explain, because there is not too much to add to the info existing in the brochure or our website.

In Full HD resolution we have AVCHD codec up to 28 Mbps (1080/50p), like in FS700, and also XAVC Long GOP up to 50 Mbps (1080/50p, 4:2:2, 10-bit depth).

In 4K, it is still Long GOP, at a maximum speed of 100 Mbps (QFHD/25p, 30p, or the well-desired “cinematographic” 23.98p).

No need to say that, if you prefer to work with a different codec, you have HDMI and SDI outputs for your external recorder (very usual this days, especially if you have your workflow totally optimized, despite I personally recommend to test and taste XAVC codec if you still haven’t done 😉 ).

In XAVC Long GOP QFHD at 100 Mbps, a 64GB SD card can host up to 65 recording minutes. In Full HD resolution at 50 Mbps, it would be around 120 minutes in the same card. And in AVCHD at 28 Mbps, it would be 290 minutes.

And you may be wondering if there’s anything to be told about RAW. Yes, it will be capable to record RAW externally in the future, but we don’t know (and we couldn’t tell) when nor how as of today.

INDEPENDENT REC TRIGGER

It was still not mentioned, but we can record in SD or MS cards in PXW-FS5’s card “A”, while “B” card only allows SD cards to be used. So, as a difference to FS700, we have two card slots.

Also, we have three recording buttons: first one in the grip, second one in the handle, and third one in the camera body. So, you can imagine: we don’t only have the classical “Relay” mode (if A card capacity ends, recording continues automatically in card B without frame loss), and “Simultaneous” mode (same content in both cards; for instance, as a backup unit or to send one of them to editing suite and the other one for colour grading), but also a third mode, called “Independent”, in which we can independently command each card from a different REC button.

It is especially useful in events like live concerts, weddings, sports, conferences… in which it’s nice to have a whole footage in one card in just a few clips (in order to not lose any action, and for synchronizing a multi-camera production if any of the cameras has no timecode), and the other cards would be used for a regular clip-by-clip recording (each song, each stage, each speaker…).

3 modes available to combine REC buttons with memory cards

3 modes available to combine REC buttons with memory cards

AUDIO

Of course, no need to say that audio input are professional XLR connectors. But, as a difference to X70 or NX3, both are physically separated (we already saw that in FS700): one on the handle and another one in the rear part of the camera.

Audio recording is 2-channels; when recording in AVCHD codec, we can choose between Dolby Digital or –even better- linear PCM; in both cases, sampling frequency is 48 kHz and bit depth is 16-bit.

When using XAVC codec, audio is again recorded in LPCM at the same frequency, but in this case precision is stunning 24-bit.

BATTERIES

Regular DC input (typical XDCAM series) can be used to feed the camera, but if you are a bit worried about FS5’s batteries, you’ll be able to keep your BP-U batteries, since it uses the same BP-U30, BP-U60, BP-U60T or BP-U90 that could be used on XDCAM handy or semi-shoulder models (EX1, EX1R, EX3, 200, X200, 150…).

That DC input I was commenting is also BC-U1 or BC-U2 battery charger’s output.

FINAL THOUGHTS

Probably I’m not the most adequate person to give a final sentence about FS5, not only because –obviously- I’m an interested party, but because I am not lucky enough to be a real user; I am just occasional, and less frequently than I would like.

However, there are some relevant aspects that are definitely clear for me:

  • Ergonomics in FS5 are almost unrivaled by any existing camera nowadays; not even FS7
  • Sensor is, simply, stunning. It allows us to use S-Log gamma curves, a crazy colour space, and we can reduce its size to Super16. For today, a sensor in a Sony camera is understood perfectly, and in cases like FS7/F5/FS5, totally demonstrated
  • That chance to shoot in Super Slow Motion at up to 240 fps in Full HD is something that worked really well in FS700, and it has been fully inherited here
  • Having the possibility to keep DoF (let’s be sincere: it’s one of the coolest features in today’s cameras) with its electronic variable ND filter is a very well designed and precise feature, to avoid overexposure in unexpected highlights
  • Any lens can be used, without any renewal needed in our lenses collection; simply by using adaptors, we can assure that working with this camcorder is absolutely inexpensive (like that fact of using SD cards)

And, finally, little “details” like being capable to send streaming or files via wired connections, or prioritizing one detected face amongst others in order to follow it with automatic focus, or its focus magnifier, its MI shoe, its proxy recording, that independent recording mode over two different cards, the included codecs, the silent slow-spinning fan, that chance to buy just camera body or also with lens… are some features that make FS5 a very interesting camera, and I honestly think –and with- that it will be a real success. J

Imagen de la nueva PXW-FS5K (con lente). Modelo sin lente (PXW-FS5) también disponible

PXW-FS5K (includes SELP18105G lens)

Kindest regards to all, and thank you very much indeed for reading this article. And sorry for its extension, but I hope it worth it.

Addition to the original article, on 12th September, in order to clarify:

Outputs
SDI (just HD): 422 10 bit
HDMI (4K/HD): 422 8 bit

Recording
AVCHD (HD): 420 8bit, 28Mbps
XAVC-L (HD): 422 10bit, 50Mbps
XAVC-L (4K): 420 8bit, 100Mbps

ISO with SLog: 3200
ISO without SLog: 1000

Alvaro Ortiz

Product Specialist / Content Creation

Twitter: @AlvaroOrtizSanz

YouTube: Alvaro Ortiz

¿Cómo se actualiza a 4K ó MPEG-2 la cámara Sony PXW-X70?

Hola de nuevo a todos.

Como algunos sabréis, la PXW-X70 es una cámara que no sólo ofrece un sensor de una pulgada (es ligeramente superior a un Super16 mm), códec XAVC, salida por HD-SDI y HDMI, posibilidad de remotearla por WiFi… sino que, hace pocos días (esta entrada data de principios de Julio de 2015), se lanzó la actualización a la versión 2.00.

Actualización a Junio de 2016: Edito esta entrada para hacerla compatible con el último «upgrade» que se puede hacer, el CBKZ-SLMP, para poder grabar en MPEG-2. Este procedimiento es análogo para la PXW-FS5 y su actualización a RAW, que tiene la referencia CBKZ-FS5RIF. 

pxwx70_3q_140725_02-1200

Esta actualización es gratuita (la tenéis en este enlace, que únicamente requiere estar registrado en la web de Sony: https://www.sony.es/pro/support/software/SET_150526_PSG/1 ), y permite transmitir en streaming y grabar en proxy.

Posiblemente cuando leáis esto incluso haya una versión de firmware más actualizada.

El procedimiento para actualizar es muy sencillo; básicamente, se descarga un archivo de actualización, se conecta la cámara por USB, y se siguen los pasos que se indican en el manual.

X70 upgrade into V2.00 - 13

Esta V2.00 también permite que, sobre ella, se pueda instalar la actualización para grabar en 4K.

Y es esta actualización la que, con toda honestidad, no es tan fácil de instalar.

En primer lugar, tened en cuenta que es una actualización de pago (si mal no recuerdo, 488 € + IVA), y se consigue a través de nuestros distribuidores (podéis ir al localizador de distribuidores oficiales de la web de Sony: https://www.sony.es/pro/ezone/dealers/broadcast/ ).

Lo primero que hay que tener en cuenta es que todo el proceso de actualización de la cámara nos puede llevar aproximadamente dos días. No, no es que la cámara esté realmente actualizándose todo ese tiempo, sino que, debido a la «logística», habrá que esperar en uno de los pasos un correo que tarda aproximadamente ese tiempo. Por favor, tenedlo en cuenta, por si tenéis algún trabajo planeado.

En primer lugar, debemos registrarnos en una página web cuyo enlace es este: https://www.ecspert.sony.biz/ . Al abrirlo, si aún no estamos registrados, deberemos pulsar «User Registration», en la parte inferior derecha:

Registro ECSite


A continuación, rellenamos los campos como en cualquier registro de este tipo, con nuestro email y la contraseña que deseemos:

Registro ECSite_2


Y, obviamente, pulsamos «Registration» para finalizar la solicitud de registro.

Ahora, nos queda esperar; este es el proceso que, como os comentaba, puede llevar hasta dos días, aunque tengo entendido que han reducido ese plazo. Importante: vigilad vuestra carpeta de spam (a mí, personalmente, se me colaron los tres correos en esa carpeta cuando lo hice con el procedimiento antiguo). Recibiréis un correo parecido a este (he eliminado parte de los datos):

Email confirmacion registro

Pulsad sobre el enlace que se adjunta para finalizar el registro, y volved a entrar a través del enlace  https://www.eCSpert.sony.biz/ con los datos del correo recibido:

Entrar a ECSite

Se os pedirá que metáis ciertos números correspondientes a los códigos que habéis recibido entre corchetes:

ECSite AccessCode


Ahora, en la lista de opciones de la izquierda, se seleccionaría «Install Key»

ECSite Accedido


, y se abrirá una pantalla en la que debemos meter el código que nos aparece en la «cartulina» de la opción CBKZ que hemos adquirido:

SW Purchase Key Notification

Purchase Key en ECSite

Al pulsar en «Search», encontrará que esa clave se corresponde a una actualización para la PXW-X70:

Purchase Key sin desplegar

Desplegamos la «Purchase Key» pulsando sobre el símbolo «>» que aparece a su izquierda:

Purchase Key desplegado

Al pulsar «Install Key Issue», aparece una ventana emergente en la que tenemos que introducir el identificador de nuestra cámara (lo encontramos en el menú «Option», y tiene el formato «nombre de cámara-número», como por ejemplo «X70-16101»),

Option ID

el nombre de usuario a imprimir (esto es sólo para tener un justificante con nuestra compra), y el número de actualizaciones que hemos adquirido (recomiendo ir haciendo una a una):

Purchase Key ventana emergente

Pulsamos «Install-Key Creation», y, aunque podemos generar unos archivos de referencia en modo texto y PDF («Install-Key(Text)» e «Install-Key(PDF)»), lo realmente importante es generar el archivo de instalación, que creamos al pulsar el botón «Install-File Output».


Ahora ya tenemos el archivo de instalación; lo metemos en el directorio raíz de una tarjeta SD o MS (preferiblemente formateada previamente en la propia cámara, y sin ningún otro archivo incluido dentro de la tarjeta), metemos la tarjeta en la cámara, y entramos en el menú:

MENU – OTHERS – OPTION – INSTALL OPTION – OK

Una vez instalado (puede llevar varios minutos), la cámara nos invita a reiniciarla al pulsar la opción «OK» en la pantalla (mensaje: «Installed. Press OK to reboot»).

Así, ya tendríamos finalmente nuestra opción instalada en la cámara. 🙂


Como veis, los pasos son muy sencillos, pero hay muchos, y no todos dependen de nosotros. Por eso he creado esta pequeña guía; lo que vais a necesitar es, especialmente, paciencia, pero seguid los pasos uno a uno, que no tiene pérdida. 😉

Un atento saludo, y, como siempre, muchísimas gracias, camaradas.

HXR-NX100: announced at Broadcast Asia

Hi all!

Maybe some of you have been active this morning on social media, and have realized that we have just announced a new camcorder at Broadcast Asia event.

NX100_3q_02-1200

This new camcorder is named «HXR-NX100». And it is undoubtfully a nice camcorder, but probably the main question out there is: «Another camcorder by Sony???». And, yes, you are right if you are wondering that. But there are a few reasons to embrace this new announcement.

Firstly, let me remind you I am just «the technical guy». Yes, I belong to marketing, and that could be seen as a handicap, but you can be sure I try to position myself much closer to the user than to the brand in most of the cases.

So, many of you may know about PXW-X70. A nice little camera, with a great (literally) sensor, and a top level codec (XAVC). It works really fine, and, due to its sensor resolution (20 Mp), I expected its low lights to be a bit «weak», but when playing with it in dark environments, it is really, really solid when managing that kind of information. You can remotely operate it, so it turns it into the perfect camera for documentaries: with a couple of them in your backpack (no heavy weight), you can shoot a nice multi-camera production held by just one operator.

But, what about those cases in which such operator prefers to do an ENG job? Obviously, X70 is a light but powerful tool, but some users prefer, when operating a camera in a handheld way, to be capable to play with the classic 3 lens rings. Yes, you can do something similar on X70 (zoom on the hand grip, iris on the little knob on the front of the camera, and focus on the lens ring – when shooting with a 1″ sensor, bokeh effect is significant), but some users were telling us that using that sensor on a 3-rings lens would be a perfect combination not only for live events (ENG, interviews, sports, concerts) but also for fictional purposes in which DoF is a critical aesthetic tool. Even, we could drop some functions from X70, if we could work on such new model. If, for instance, you are a YouTuber, a student, a freelance, a wedding videographer… you will surely be interested on NX100, and you will miss nothing.

NX100_lens_05-1200

And there it is: HXR-NX100. Probably that was the gap we were missing during months: a high-level but basic price tool that suits almost every situation, in an entry and mid level.

[From now on, please consider that I haven’t had the model in my own hands, so I can just judge it according to the information I have, as well as my prior experiences with other models]

It will look very familiar for those of you that have already worked with any Sony model, but if you haven’t, you should know that operation in our camcorders uses to be very intuitive, and optimized for the operator (we bear in mind such a big quantity of feedback that sometimes it’s almost unmanageable 😛 ).

ABOUT THE TECHNICAL SPECS

Let’s talk a bit about the specs. Yes, the boring thing. But we cannot skip them.

¿Sensor? What has been labeled like «the grand one» or «the big one» (with no… let’s say… hidden implications 😉 ), referring to its size in inches. From my POV, it’s the perfect balance between those people for which a Super35 or an APS-C sensor (like on a FS100 or an EA50, respectively) is «too big», since it demands a constant focus operation, and those ones that claim that a 1/3″ sensor doesn’t allow them to play enought with the DoF. So, what am I referring to? That either if you are needing a «reality» look (let’s say news or sports) or a more «aesthetic» or «fictional» look, you can reach both with this camcorder, via the way you prefer: closing iris, moving the camera a bit further, playing with the ND filters…

NX100_leftside_03-1200

… because, yes, it does have ND filters. So, good-bye to those situations in which you are shooting in a dark environment and, when going outside, you need to fastly close iris, increasing your DoF. Now, simply apply an ND filter, and keep your iris open. Nothing new, of course, but strange to be found in a camera ranged at this price.

But, Alvaro, if you have always recommended to use the same resolution in the sensor as we have in the outputs, why are you defending a 20 Mpx camera? Oh, nice to hear that question! Well, in fact, I keep saying the same: due to pixel size, I prefer the sensor resolution to be as maximum the same resolution as the highest output. Sorry? Yes, let me explain: if you are using a 4K-capable camera, I prefer sensor to be 4K/8.3Mpx, but no larger; that way, each pixel has its maximum area, so it can collect the maximum quantity of light possible. So, how could it be interesting to have a bigger resolution in the sensor? Obviously, we sacrifice pixel density (thus, dynamic range), but with the high sensor quality existing nowadays, that is affordable (unless we are thinking of latitude for cinema applications). On the other hand, we can use that bigger pixel density to analyze signal. And that analysis helps us to have other features available; in this case, the well-known Clear Image Zoom.

Yes, I have heard that before, but… how does it work? Actually, it’s really easy. In a classic Digital Zoom, the usual way to do it is through interpolation: if a value of «1» is found in a pixel, a value of «3» is in an adyacent pixel, and we want to «zoom in», we simply use an average, so the result should be «2». That could be called a «spatial interpolation» (similar concept to an intra-frame codec). But, according to not only the previous frames, but also a classifying algorhythm, that signal can be compared to hundreds of patters (let’s say not only «radial movement» or «panning», but even some recognizable patters, like, let’s say, «face», «sky», «flowers», «pavement»…), and then that prediction is processed together with the interpolating mechanism, so that the final result provides a significantly bigger quality when zooming in. Is it clearClear… Image Zoom. This algorhythm can convert the optical 12x zoom into a 24x, and, added to that, we can use a digital extender to reach a 48x zoom. You can take a look on a [low quality; sorry] video that I uploaded some months ago in my YouTube channel.

NX100_front_08-1200

Another feature that some users will appreciate is the codecs available in NX100. I will skip DV recording for obvious reasons. But, added to that AVCHD 2.0 that allowed up to 50p in Full HD (it is «only» 28 Mbps), this time we can use the same last generation codec we have, for instance, on Alpha A7s, which is an implementation of XAVC codec. Bear in mind that, for recording on that XAVC-S codec, you’ll need to use at least a «Class 10» or higher SDXC card. For AVCHD, Memory Stick (Pro Duo, Pro-HG Duo, XC-HG Duo) or SD/SDHC (classes 4, 6 or 10) can also be used. Oh, and, of course, stereo audio is recorded in LPCM (in AVCHD, it can be also AC3).

About the way to record, apart from the typical «relay» or «continuous» recording (one of the cards runs out of capacity, so the clip continues on the other card, since the camcorder has double media slot), or the «simultaneous» or «backup» mode (same clips on both cards; for example, for security, or for using one of them to start editing, and the other one for colour grading), there is a third way to record, that we saw for the first time in NX3 ( in this video ), which allows us to shoot DIFFERENT contents in both cards, with each card commanded by a different REC trigger. Imagine you are recording a live concert; in one of the cards, the whole concert can be stored, while in the other one, you can shoot just the highliths or each song independently. Very useful for editing, or for avoiding loosing some interesting take.

NX100_rightside_04-1200

I know this is getting boring (sorry for that, and for my poor English, btw), so I will just remind some other nice features, like the MI shoe (no external cables for UWP-D receiver or HVL-LBPC torch), the LowLux mode (highest sensitivity mode with an assignable button), picture profiles and up to 99 camera profiles (copy from 1 NX100 to another, or use the cam profile according to the actual situation), Intelligent Auto (optimal setting for a certain scene after evaluation), LanC remote control…

NX100_rear_06-1200

Mmmmmh… yes, but, what about SDI, WiFi…? Well, those are the features that, according to the price range, needed to be dropped from other models (for instance, X70). However, and this is also a personal opinion, in most of the situations in which this camcorder will be probably used, I woldn’t miss them (but, obviously, this is subjective).

NX100_top_07-1200

So, after that revision of the technical specs, let’s wait to have this nice little camcorder in our hands (I’ll probably have a pre-sales version in a couple of weeks) in order to see which sensations are provided. Unfortunately, I am not a skilled user, so let’s wait especially for the reputed guys to do some review…

Thanks for reading!

Alvaro Ortiz

Product Specialist for Monitors and Entry-Level Camcorders

Sony Professional Solutions Europe

Twitter: @AlvaroOrtizSanz

Noise or aliasing problems on a 4K sensor?

Hi all again.

I have just been called a few minutes ago about a very well-know usage problem on 4K sensors, and especially in our FS700’s: customers use to claim that some artifacts or «moiré/aliasing» effects appear on their camcorders, especially after upgrading into v3.0 (that one that allowed to output 4K, amongst other new features).

Fortunately, those effects only appear when shooting in Full HD or 2K mode. Why do I say «fortunately»? Because it’s not a malfunction in the sensor, but it has a physical explanation.

If you have ever used a PMW-F55, you may have seen that there is an option called «CBK-55F2K», which is actually an OLPF (optical low pass filter) of which cut-off «frequency» (actually, wavelength) is 2K.

F55body

As you know, cameras like FS700, FS7, F5 or F55 incorporate a native 4K sensor. In audio environment, if we want to record certain bandwidth (let’s say the typical 20 kHz), we need to filter it at its maximum frequency before sampling (and sampling frequency should be, at least, double that rate, according to Mr. Nyquist). That filtering process will avoid undesired frequencies to appear and cause artifacts on the final signal. Well, the same happens for optical signal: if we are shooting at 2K resolution, but our sensor is 4K (or, in a DSLR, much bigger), it is recommended to use a low-pass filter to avoid undesired artifacts/noise on that band that goes from 2K to 4K wavelength.

CBK-55F2K Filter - 3Q

So, for those models in which CBK-55F2K cannot be installed, it is recommended to use an EXTERNAL optical filter; CBK-55F2K is mounted between sensor and lens, and is easily detached or installed via screws. In FS700’s case, a 2K-cutoff wavelenght low pass filter should be installed before the lens, as if it was a regular filter.

NEX-FS700 3Q5

Finally, let me explain how I understand that the upgrade into 4K works on FS700. You may remember it was relased on its birth as a «4K-ready» camcorder. About 1 year later, we announced how it could be converted into a «real 4K» camcorder, allowing it to output 4K via its 3G-SDI output (you can see another article I wrote last week about how it works). That upgrade needs to be done via both software and hardware; that’s why it was usually charged (except in sporadic events in which we did it for free). In models NEX-FS700R and NEX-FS700RH, that upgrade was installed by default.

HXR-IFR5 with AXS-R5

[Image extracted from the V3.00 presentation when it was released]

Bear in mind this explanation is just «conceptual», and is far away from being accurate and technical; just my understanding. This V3.00 firmware allowed to output RAW signal (2K or 4K) via a compressed dataflow (not actual baseband video) through FS700’s SDI output. Remember I’ve just said RAW. So, as the sensor outputs the signal, it is driven through 2 ways: first one, in RAW, into the encoder for outputting that dataflow through the BNC connector, and the second one, the regular one, to which we can apply signal modifications (picture profiles, including S-Log2, which is another improvement via V3.00 version, codec, HDMI output… all those typically «FullHD»). So, as you can see, sensor is «serving» signal to those two paths, but don’t forget it is a native 4K sensor, so, unless we work in 4K resolution (over AXS-R5 or Odyssey7Q), we are likely to find those artifacts due to the fact that, between 2K and 4K wavelengths, there is a gap in which such effects can be shown.

I just wanted to explain that those effects are actually not due to a malfunction on the camera, but a purely physical light behaviour. Also, sorry for being very «soft» about the explanation of how RAW path works in FS700; just wanted it to be comprehensible enough.

Thanks-a-lot for reading!

Alvaro Ortiz

Product Specialists Entry Level Camcorders and Monitors – Sony Professional Solutions Europe

How to record 4K from a NEX-FS700

Hi all.

First of all, this is my first article in English in this little corner, so I do apologize for the likely spelling and grammar mistakes I will surely commit. I hope that «the importance lays on the content» is really applied here. Also, bear in mind that I only work for Sony, but there is no revising from the company, so this is just and only my PERSONAL blog, related to product.

As you may know through other channels (YouTube, Twitter, presential presentations, fairs…), I work as Product Specialist for Sony Professional Solutions Europe. My colleagues and I try to provide pre-sales technical knowledge about the products in our division; in my case, camcorders.

So, one of our star products is NEX-FS700. As you may know, it’s a Super35 mm CMOS camcorder that can output 4K RAW signal, can record super slow-motion bursts (up to 240 fps in FullHD sensor scanning, and up to 960 scanning about 20% of the horizontal lines), and is compatible almost with any lens system thanks to its E-mount system.

One of the most asked questions is about 4K: when announced and released, it was told to be a 4K-ready camcorder. About 1 year later, we unveiled how we could do that: via a hardware upgrade, that would allow us to output RAW signal through its 3G-SDI interface.

Wait a moment… 4K, RAW, and SDI? What??? Yes; as you know, for a 4K signal, a HDMI 2.0 connection can be used or, on a professional environment, 4 3G-SDI cables are typically needed. So, where’s the trick? Actually, what we are doing there is compressing the signal, with a very low loss (or even lossless; I would need to review) algorithm. So, no standard communication, no baseband output (for instance, on Alpha 7s, the QFHD signal is outputted in baseband format, so any device that can «talk» that language will be able to display or record the signal).

As I was telling, we are using and algorithm, and it was originally designed for working on an AXS-R5-based recording solution. AXS-R5 is a recorder that was originally designed to be attached directly on the rear part of F5 and F55, and records signal over AXS memory cards. Such a high-level system needed a high-level algorithm to work with, in the case of FS700. So, we apply that algorithm to its output, we transmit that «bitstream data» (not «video stream», actually), and on the other side it needs to be decoded. That is the first function for HXR-IFR5, the interface that we need to insert between the SDI cable and AXS-R5.

The second function that IFR5 does is to adapt physically R5: as told before, AXS-R5 was designed to be attached to F5/F55, so we need to provide that physical interface and, obviously, its multipin connection. And its third mission is to have a control panel over the recorder, in case we need to operate R5 directly (for instance, playback function over R5 cannot be commanded from FS700 – and bear in mind that R5’s output in that case is downconverted FullHD, not 4K).

HXR-IFR5 NEX-FS700 monitoring

[These slides are extracted from the presentation we used either when that option (v3.0) was announced), or at the FS700’s announcement time]

HXR-IFR5 with AXS-R5

Finally, as the only connection between FS700 and IFR5 is a single SDI cable (it can be really long, about 70 m, so nice for underwater shooting, cranes, etc, in which we don’t want to have a bulky and heavy camera head, and the rec system can be put in another location), there is no power, so a battery or a DC power feed needs to be used on the recording «kit».

Ok, now it’s clear how it works, but… price? Well, we can say that, more or less, the price for the recording part (IFR5, R5, BP-FL75 olivine battery, AXS memory and card reader) can be comparable to the one of the camcorder itself. Nice if you already work with F5/F55, or your rental house have those camcorder models, but for a freelance user that only uses FS700, it can be really costy.

So, there is -at least, so far- an alternative solution to AXS-R5. I told that the algorithm we were using for outputting RAW signal is Sony property. The only company (as of October 2014, at least) that has got access to it is Convergent Design, and their Odyssey7Q recorder can be used not only as a decoder and recorder, but also as a monitor due to its OLED screen.

RAW output can be recorded in 12-bit depth DNG files. Also, for 4K, it can de-Bayer the 4K RAW signal flow from the SDI interface, downconverted into HD, and then recorded in Apple ProRes 422 (HQ) format. It has been announced that in a near future, 4K ProRes will be also available.

Seems nice, but… what about the price in this case? That is one of the strong points: as of October 2014, Odyssey7Q is announced for about 1421 € (on their website it is expressed in US dollars, and not with or without VAT), and the FS700 upgrade is priced about 630 €. So, a solution that costs about 2000 €.

You can find detailed information about Odyssey7Q here:

https://odyssey7q.com/products/odyssey7q.html

and about its FS700 upgrade here:

https://odyssey7q.com/products/odyssey7q/sony-fs700.html

So, from my PERSONAL point of view, please bear in mind what you need, the format you are likely to work with, and then make your choice. Also, as a note, and because there were also some comments about it, Convergent Design is NOT Sony-owned company. It’s just a third party high quality recorder manufacturer, as Atomos, Focus, Cinedeck… can be. Or as the multiple E-mount adaptors (to EF, to PL, to… almost every lens system) manufacturers: Metabones, MTF, Novoflex, Birger… they are not owned by Sony, also.

E-mount adaptors

Finally, let me thank you for reading this -probably boring- article, but I think that sometimes it is useful that a Sony guy can tell you this kind of information as it is, without any official marketing tool involved between you and us.

Thank you very much indeed, and, again, sorry for my English. 🙂

PS: I will try to review this article and, in case there is anything to correct (probably), I will do, but preferred to provide it to you all asap.

¿Cómo funciona un monitor OLED profesional de Sony?

Hola a todos de nuevo.

Siento no haber encontrado un título más atractivo para esta entrada; de hecho, en principio iba a llamarse «Cómo funciona un monitor OLED», pero se ha escrito tanto, y tan bien, que no tenía sentido incidir en el mismo.

Sin embargo, no he visto tanto acerca de cómo funciona un monitor OLED profesional de Sony. O los motivos físicos de que la tecnología OLED proporcione tan buenos resultados, y se puedan aplicar de forma fiable al entorno profesional.

En primer lugar, para saber, de forma general, cómo funciona un OLED en comparación con las dos tecnologías que teníamos hasta ahora: LCD y TRC.

LCD Y TRC: CÓMO FUNCIONA CADA TECNOLOGÍA

En primer lugar, hemos de pensar que uno de los factores más importantes para delimitar el entorno profesional en que se pueda utilizar un monitor es el espacio de color («cantidad de colores distintos que se pueden representar en la pantalla», para entendernos).

En un TRC (tubo de rayos catódicos), la imagen se escanea «punto por punto», ya que hay un triple (R,G,B) haz de electrones que salen de un cátodo (de ahí el nombre) e impactan sobre unos fósforos/fosfitos que se encuentran en la parte posterior de la pantalla, tras atravesar una rejilla. Esos tres rayos tienen que incidir exactamente en cada uno de los subpíxeles de la parte posterior de la pantalla, y es muy habitual que haya que efectuar ajustes con cierta asiduidad para alinear esos tres haces. Por otra parte, son unos monitores muy sensibles a los campos electromagnéticos, y no sólo a la situación típica de tener un altavoz cerca de «la tele de tubo», sino incluso al campo magnético terrestre, que puede llegar a condicionar la posición del monitor en nuestra sala de edición o de ajuste de color.

Obviamente, el factor más influyente para determinar el espacio de color es la pureza de cada una de las componentes (RGB), y, por lo tanto, de los fosfitos de la pantalla. Además, como los rayos se emiten desde «un punto», proyectando a su vez esos rayos sobre otro punto (el píxel), si utilizásemos una pantalla plana los rayos no recorrerían la misma distancia en el centro o en las esquinas de la imagen, y podría darse el caso de que apareciese cierta aberración geométrica. Por eso (y por consistencia/robustez de la pantalla – recordemos que dentro tienen, idealmente, vacío) las pantallas de tubo han tenido tradicionalmente el interior cóncavo, «redondeado», excepto en el que quizá ha sido el máximo exponente en lo que a calidad en TRC se refiere: la tecnología Trinitron de Sony, que aunque tenía cierta curvatura horizontal, no la tenía vertical (además de no utilizar rejilla de sombra, sino rejilla de apertura). Hay mucha literatura al respecto.

Aunque la tecnología Trinitron abría las puertas de una mayor resolución y una reproducción de bajas luces realmente profunda, todos recordamos la sensación de desasosiego que entraba cuando teníamos que mover un monitor de tubo. Peso y volumen, sus mayores problemas, aparte de eficiencia energética, seguridad, etc. Pues ahora imaginaos un panel de monitorado en una unidad móvil. Pobres amortiguadores. Y el reflejo en la pantalla, o la vista lateral: la luz se refractaba en el propio cristal, y se dispersaba hacia los lados de modo que limitaba muchísimo el ángulo de visión.

Así que, por suerte o por desgracia (hablo de las primeras generaciones), llegó la tecnología LCD al mercado de forma masiva, y, lógicamente, también al entorno profesional. Y, sí, todos recordamos los dos principales problemas de la tecnología LCD: los negros y el arrastre. Pero quizá sea mejor entender cómo funciona una pantalla LCD para dar una explicación a esos efectos.

En primer lugar, al fondo de la pantalla, tenemos un emisor de luz blanca. Tradicionalmente ha sido algo tan sencillo como unos cuantos tubos fluorescentes (CCFL) distribuidos regular y horizontalmente. Más adelante se utilizó la tecnología LED, bien mediante LEDs blancos, o bien alcanzando el color blanco mediante suma aditiva (de LEDs rojos, azules y verdes); en ambos casos distribuidos uniformemente a lo largo y ancho de la parte posterior de la pantalla.

La luz así generada es «caótica»: es blanca, sí, pero no tiene ningún «orden», ninguna polarización. Sí, sí, el mismo concepto que se utiliza en las gafas de sol para eliminar la luz que procede del suelo (y que, por tanto, conocemos su ángulo de incidencia, más o menos).

Pues bien, esta luz tiene que ser polarizada para entregársela «ordenada» a la capa de cristal líquido: se hace mediante un polarizador, que, para entendernos, es «un peine», que hace que todo el campo eléctrico de la luz que lo atraviesa sea paralelo entre sí, y lo mismo con el campo magnético (recordemos que la luz es un campo electromagnético). Así, por ejemplo, pensemos en un peine puesto en horizontal, y sus cerdas, por lo tanto estarán en vertical; sólo la luz que tenga polarización vertical lo podrá atravesar.

Lo siguiente que atraviesa la luz es un electrodo (cátodo o ánodo) transparente, al cual están «ancladas» las moléculas de cristal líquido. Obviamente, la siguiente capa es el propio cristal líquido; es una sustancia a medio camino entre un sólido y un líquido, puesto que sus moléculas (bastante grandes, por cierto) tienen cierta ordenación por ser típicamente longitudinales, pero también disponen de una cierta libertad de movimiento – por eso tenemos que anclarlas a uno de los dos electrodos-. Y, para terminar de confinar la capa de cristal líquido, al otro lado tenemos el otro electrodo (ánodo o cátodo), pero que no tiene «anclaje» con las moléculas de cristal líquido más cercanas, para permitirles moverse.

Tras ese electrodo, otro polarizador (por ejemplo, en horizontal) que entrega la luz a los filtros del panel, que son verdes, azules y rojos, y que finalmente por delante llevan una capa que da consistencia (algun material sintético parecido al cristal o al policarbonato).

Vale, esas son las capas, pero, ¿cómo funciona? Nos habíamos quedado en que «peinábamos» la luz. Tras pasar por ese polarizador y por el primer electrodo, la luz, ya polarizada, se entrega a la capa de cristal líquido, que, recordemos, está «anclada» a ese electrodo. Así, maximizamos la transferencia de luz. Es como decir que la luz «vertical» se encuentra unas «puertas verticales» al entrar al CL. Y en el CL, dependiendo de la tecnología (voy a referirme a TN – Twisted Nematic, para hacer el ejemplo más digerible), se produce mayor o menor giro de la luz, puesto que en un TN, dependiendo del voltaje que tenga en los electrodos que lo rodean, las moléculas giran más o menos grados. Y se entrega al otro polarizador, al otro lado del CL.

Es decir, si un píxel está con una luminancia al 100%, se aplica máximo voltaje entre los electros que confinan al CL, provocándole un giro de 90º, y la luz que entra con polarización vertical gira en el interior del CL esos 90% (como si fuese un tramo de montaña rusa, o un tornillo de 1/4 de vuelta), y sale hacia el otro polarizador con polarización horizontal, y como ese polarizador está dispuesto en polarización horizontal, lo atraviesa. El caso opuesto: si un píxel tiene que estar al 0% (negro), no se aplica tensión entre ambos electrodos, el CL no se orienta de forma que pueda girar la luz, y por lo tanto la luz queda bloqueada porque no puede atravesar el segundo polarizador, ya que lo ataca con polarización vertical, y ese polarizador es horizontal.

Posteriormente, como ya he mencionado, tenemos los filtros R, G y B que dotan de color a esa luz: tratamos, por tanto, por separado la luminancia y la crominancia.

Parece buen plan, pero, entonces, ¿por qué no ha funcionado como debía, excepto en los monitores de más alta gama?

En primer lugar, el «leaking» o «fugas»: aunque, en teoría, el CL oriente la luz como queramos, se pueden producir reflexiones y refracciones dentro del panel, y es por eso que incluso a bajas luces, era muy difícil alcanzar un nivel de negros «decente». De hecho, recordaréis que era muy, muy distinta la sensación del monitor LCD con señal en negro y con el monitor apagado: sabíamos perfectamente que el monitor estaba encendido debido a este ligero brillo azulado que emitía, pese a no tener señal. Por eso la reproducción de niveles bajos de señal era bastante deficiente, sobre todo en equipos de bajo coste.

Y otro de los artefactos típicos era el «motion blur» o «arrastre». Se debe principalmente a dos factores: el comportamiento del cristal líquido es «con memoria», debido a que obedece a unos ciclos de histéresis en su respuesta de paso de luz frente a voltaje. Sorry por ponerme en plan técnico. Esto hace que si damos un impulso eléctrico a un píxel, esa posición del CL se mantiene hasta que un nuevo pulso aparece. Claro motivo de arrastre, ¿no? El segundo factor es que, como he comentado, las moléculas de cristal líquido son relativamente grandes, y, por lo tanto, tienen inercia, y esa limitación física hace que no puedan responder «a velocidades eléctricas» o «electrónicas». Por eso los fabricantes de monitores, especiamente del entorno profesional, son extremadamente selectivos con la capa de CL: si la hacen tan estrecha que las moléculas puedan conmutar con cierta velocidad (para reducir el arrastre), la capa no será tan gruesa como para filtrar totalmente la luz en caso de reproducir bajas luces, y por lo tanto el comportamiento de los negros no será el esperado.  También se pueden aplicar algunos algoritmos para reducir el motion blur; por ejemplo, si el CL es suficientemente rápido, podemos aplicar el impulso de señal, y a continuación aplicar un «impulso a 0 voltios» para que las moléculas retornen a su posición de negro antes del siguiente campo.

Incluso en algunos monitores profesionales finalmente se ha podido implementar un escaneo entrelazado nativo: las pantallas LCD son, por naturaleza, de escaneo progresivo (tenemos que dar señal a TODOS los píxeles en cada campo), pero si conseguimos mantener las líneas pares e impares (alternativamente) «iluminadas con negro» (vamos, «apagadas»), podremos reproducir la señal en entrelazado nativo.

Otro «pequeño» inconveniente es que, como habéis podido comprobar, la luz originalmente blanca atraviesa muchas capas (dos polarizadores, dos electrodos, una capa de cristal líquido, los filtros RGB…), y eso hace que, si la transparencia de cada capa no es elevada, la luz acabe «tiñéndose». Estaban muy de moda las televisiones «LED», haciendo referencia a su retroiluminación (y con la intención, claro, de acercar la mentalidad de algunos usuarios a que estaba «cercano al OLED»), pero no por ser retroiluminación LED tiene por qué dar unos blancos más puros que con CCFL (eso sí, el panel será más plano).

VALE, Y AHORA, ¿CÓMO FUNCIONA UNA PANTALLA OLED?

En primer lugar, dejemos claro que la evolución de las pantallas OLED ha sido análoga a la de los monitores LCD: se comenzó con pantallas de pequeño formato, y cuando se han alcanzado unos niveles de calidad y unos costes razonables, se ha ido incrementando el tamaño de los paneles. Tengo en casa mi amado MiniDisc MZ-RH1, que ya traía una pantalla matricial monocroma OLED. Ahí queda eso.

A grandes rasgos, el problema de la fabricación de los OLED es que se tiene que hacer crecer el sustrato de silicio en un área cada vez más grande, y la eficiencia que se tenía al principio era relativamente pobre (no se respetaba el porcentaje mínimo de píxeles muertos, o hacerlo era extremadamente caro). A medida que se han ido mejorando los procesos de fabricación, se ha optimizado ese crecimiento del silicio, y hoy en día tenemos este tipo de pantallas incluso en televisores de consumo.

Con respecto al funcionamiento, más simple no podría ser: ¿recordáis la estructura de los LCDs? ¿Retroiluminación, polarizador, electrodo, cristal líquido, electrodo, polarizador, filtros? Pues bien, quedémonos sólo con lo último, pero en lugar de ser filtros, hagamos que sean directamente los emisores de luz. Así, en lugar de compartir el blanco entre ellos y filtrarlo (mezcla sustractiva), haremos mezcla aditiva.

Así, tendremos el control DE CADA SUBPÍXEL EN CADA MOMENTO. Adiós al motion blur. Adiós al leaking. Así que adiós al arrastre y al pedestal de negros. E, insisto, «en cada momento»: nada de ciclos de histéresis o retención de señal hasta el siguiente frame (a menos que queramos emularlo mediante algún algoritmo; de hecho, hay gente que en determinados casos aprecia cierto flicker debido a la rapidez del propio panel).

Si quiero rojo, sólo ilumino los subpíxeles rojos, y el verde y el azul se quedan callados. ¿Blanco? Pues todos a trabajar al 100%.

Como podéis imaginar, tener un control tan preciso y absoluto sobre el panel hace que, lo primero, podamos trabajar incluso con más profundidad de bit, puesto que ya únicamente vamos a depender de la electrónica, no de la capa de CL. Además, el contraste es insultantemente alto, puesto que ¿cómo se genera el negro? Apagando todos los subpíxeles, es decir, ¡NO HAY LUZ! Por lo tanto, el margen dinámico del monitor es mucho mayor (ya veremos en un medio plazo cómo trabajar con HDR en monitores profesionales).

Pero con esta tecnología Sony ha ido un paso más allá. Tienen una marquita, un logotipo con una tipografía rara, de color verde, que se hace llamar «STE». «Super Top Emission». Suena a la lista de los más oídos de la semana, pero ¿a qué hace referencia?

En lugar de disponer de los electrodos de cada uno de los subpíxeles en lados opuestos del mismo (lo que haría que la luz tuviese que atravesar el electrodo que está entre el LED y el observador), han situado los dos electrodos en el mismo plano, y el LED está edificado «sobre ellos». Buena idea, pero lo realmente revolucionario es la segunda parte: dentro de cada uno de los LEDS, usar una «microcavidad».

Muchos recordaréis, o tendréis una ligera idea, de lo que es una cavidad resonante en audio, o simplemente un filtro: algo que, debido a ciertos «rebotes» (eléctricos, acústicos…) actúa como un filtro de ciertas frecuencias o longitudes de onda. Pues la microcavidad de la tecnología STE obedece al mismo concepto, pero dentro del entorno óptico: cada LED tiene un pequeño «recinto» que hace de filtro de longitudes de onda.

¿Y para qué sirve eso? Cada LED, pese a ser ya de por sí de gran pureza, emite centrado en una longitud de onda correspondiente al rojo, al verde o al azul. Pero alrededor de esa longitud de onda puede abarcar más o menos espectro (como una campana de Gauss). Si logramos reducir ese espectro «adyacente» a la longitud de onda que realmente deseamos extraer, ese color será más puro, y tendremos mucho más control sobre esa componente a la hora de hacer una mezcla aditiva de color. Es decir, el blanco será más puro, y podremos abarcar un mayor número de colores a reproducir, lo que quiere decir que tendremos un mayor espacio de color.


¿Y CÓMO ESTAMOS A DÍA DE HOY?

Pues la verdad es que las noticias son muy, muy buenas.

Sony ya disponía de la familia TRIMASTER en tecnología LCD, y ahora la heredera es la TRIMASTER EL (ElectroLuminiscent, en referencia al OLED). Los monitores actuales (hablo a día 23 de Septiembre de 2014) de la familia PVM-A (PVM-A170, PVM-A250) están orientado a un entorno broadcast, pero sin las exigencias (por ejemplo, de espacio de color) del mundo de la cinematografía.

En monitores de referencia para ese mismo entorno broadcast están los modelos BVM-F (BVM-F170, BVM-F250), pero los monitores de grado 1 para cine, con la menor tolerancia del mercado, son los de la familia BVM-E (BVM-E170, BVM-E250).

Todos tienen resolución FullHD (1920×1080) ó 1920×1200, pero hoy en día se habla mucho, y ya es una realidad, el 4K.

Ya teníamos desde hace meses el PVM-X300, de resolución 4K real (4x 2K) en tecnología LCD, pero este IBC se presentó, por fin, el esperado monitor OLED de grado 1 en resolución 4K, el BVM-X300. Como su hermano, tiene 30 pulgadas de tamaño, lo cual para salas de ajustes de color/etalonaje parece ser a lo que los coloristas están acostumbrados (recordemos que muchos no han pasado por la etapa LCD, y harán la migración directamente de TRC a OLED).

Pero, vamos, tenéis bastante información al respecto en la parte profesional de la página web de Sony (os recomiendo echarle un ojo; tiene algunos documentos interesantes), y, si habéis leído hasta aquí, estaréis deseando que llegue el final para recuperar un poco de vuestra vida, porque posiblemente ya se hayan olvidado hasta de vosotros. Disculpad por la extensión del artículo…

Un atento saludo, y MUCHAS GRACIAS 🙂